How can you transfer a website from hosting to vps, or from one hosting to another, or from one vps to another? How to use Vultr VPS? Is using VPS easy? All questions will be answered in this article.
First, you should understand the differences between VPS and Hosting, the advantages of VPS, and why you should use it, as well as how to create a VPS. Please refer to this article first.
After understanding whether to use hosting or vps and how to create one, let’s delve into the detailed process of transferring a website from hosting to vps.
Tools Preparation
- 1 VPS Vultr Server Singapore (for Vietnamese sites) — VPS Server US (for Global sites) already created
- Bitvise tool for accessing VPS
- A VPS management tool, currently Larvps is the best. Previously, there were Hocvps and VPSSIM, but now they are outdated and the founders have neglected them, no longer optimizing the system
- Access to domain provider and domain management panel
- Website already running
- All In One Migration Plugin and All-in-One WP Migration Unlimited Extension Plugin
Operating Principle
Honestly, it’s quite simple. Many people feel scared or insecure because they don’t understand it. But for me and many others, backing up website data as a contingency is essential. It keeps the website safe and secure, preventing sabotage, and makes recovery and handling easier.
Any work should follow the principle of “Carefulness“, which will save a lot of additional costs even though the initial period might be a bit difficult. Anyway, let’s get into the principle.
On an active website, we take a snapshot (capture all website data) into a image file (similar to Ghost Windows). Store this file as a backup in case the website has issues; we can restore this image to revert to the previous state at the time of backup.
Introduction to All In One Migration Plugin
There are many ways to backup website data, but since I don’t know much about coding, I choose the easiest. That is using the All In One Migration Plugin, available in the WordPress library. The free version allows Export (create backups) without size limit. However, its Import (restore data) has a size limit of only 512Mb.
Due to this limit, another extension plugin called All-in-One WP Migration Unlimited Extension is needed. Its paid version is sold at $69 by servmask. If you prefer using legitimate products for peace of mind, you can purchase it. This plugin can be used on multiple sites.
The paid version allows exporting to platforms like Google Drive, Dropbox, FTP, Amazon, One Drive, etc.
Thanks to handsome Đặng Lê Nam, who shared a version allowing import of up to 9Gb, which works very well. If you can’t afford it, you can use this version. Since it’s shared, I also use it for my sites, but I don’t know if it contains anything harmful. If you’re worried about viruses, don’t use it :V
Download link for the 9Gb version: Click here
Many people share methods to set the Unlimited version of this plugin by modifying code, but it doesn’t work. So, don’t waste time trying. I’ve tested these methods.
Steps to transfer website data from Hosting to VPS
Basically, transferring data from host to host or from host to vps is the same. It’s just Backup and Restore. So, no need to make it complicated or stressful.
#1. Backup Data
The purpose of backup is to save data in case of risks. This is necessary for anyone owning a website. Do it weekly, guys.
Step 1: Install the All In One Migration plugin with the 9Gb version using the shared link or go to Plugins in your website, search for All in one, find this plugin, install and activate it.
Step 2: If your theme is in Vietnamese, go to All-in-One WP Migration, choose Export. Select export as file.
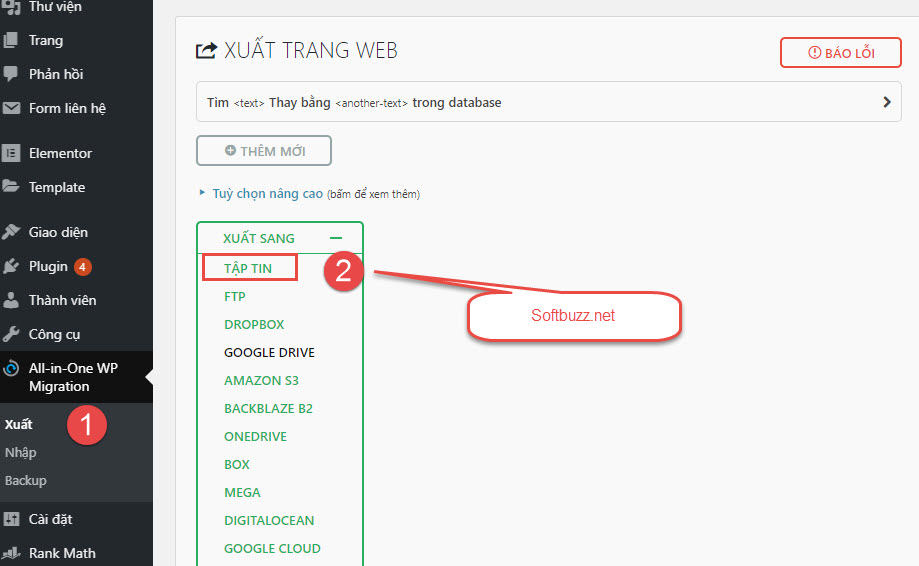
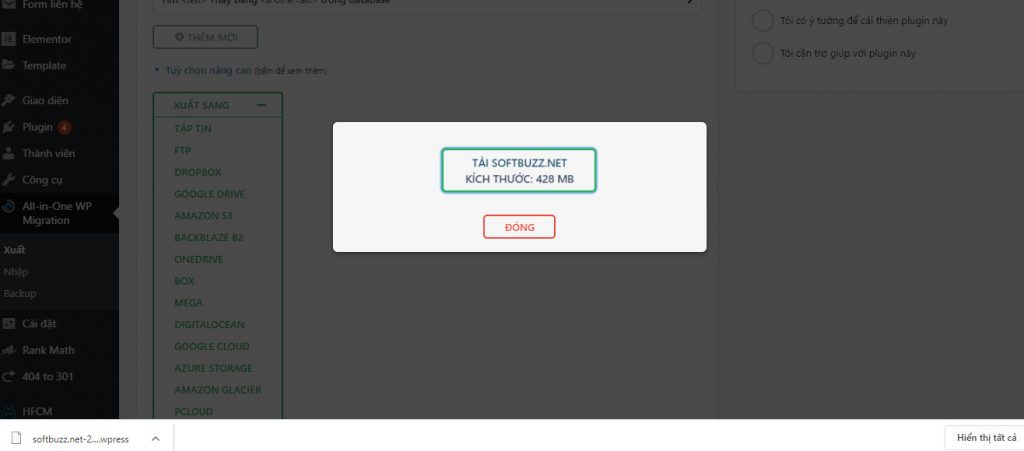
Step 3: After choosing export, it compresses data into a file. For example, the file size is 428Mb. Installing the Free plugin allows easy data download/upload. Save this file as a backup.
#2. Set up Management Tool for VPS
Previously, I used VPSSIM and Hocvps to install VPS, but now both are outdated, and their developers no longer maintain them. Meanwhile, Tong Huynh – the founder of Lar.vn (a top developer of SEO tools in Vietnam) is developing LarVPS, which is very high-quality and suitable for VPS users. I tested it and found it very smooth, with very fast website load speeds using LarVPS.
This article will guide you in detailed installation of LarVPS on VPS.
Step 1: Open your Vultr account and select the VPS you previously set up. If not created, refer to the beginning of this article for the VPS creation guide. Then copy the IP address and Password.
Step 2: Use Bitvise to log into your VPS, as previously guided.
From the Bitvise command line interface, run the following command to install LarVPS:
curl -sO https://larvps.com/scripts/larvps && bash larvps
Step 3: Change SSH port and PHPMyAdmin port arbitrarily. I usually set SSH port to 666 for easy remembering, and keep PHPMyAdmin default port 2992.
When prompted whether to set up LarVPS, press “Y“. The installation will proceed automatically, taking about 5-10 minutes. Then, the VPS will reboot itself. That means LarVPS installation is complete.
Turn off Bitvise interface and reopen after 2 minutes. Remember to change SSH port back from 22 to the one you set earlier, e.g., 666, to access VPS. Note this step.
#3. Configure DNS for your domain
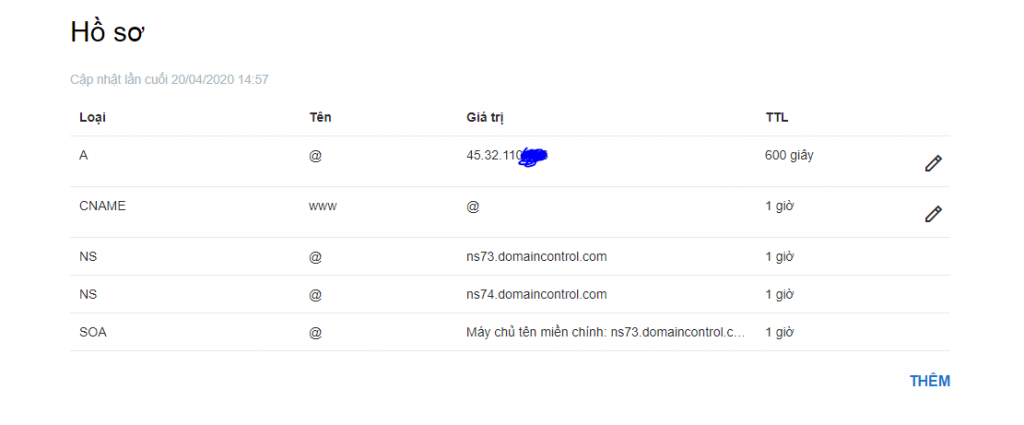
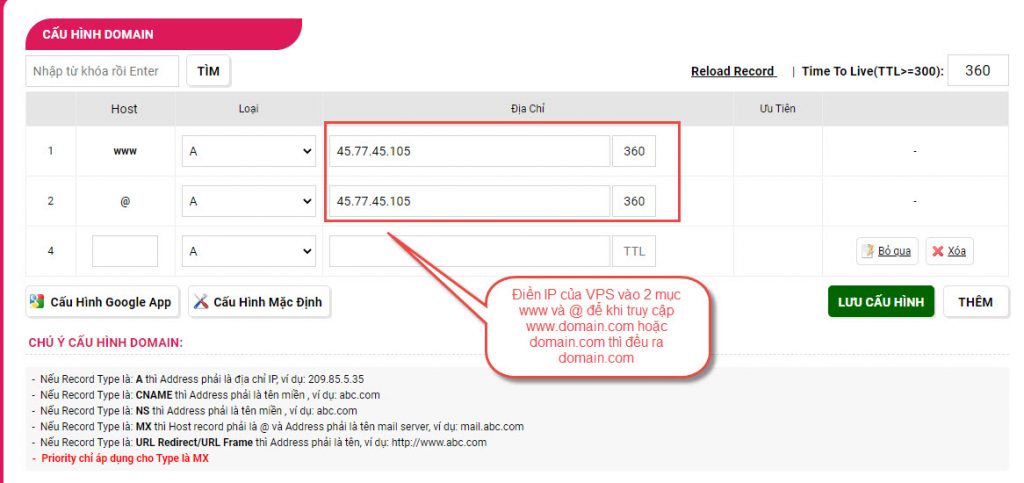
Depending on your domain provider, the DNS interface may differ. Generally, you just need to paste the VPS IP into your domain’s DNS management panel according to your preference. Popular providers include Godaddy, Namecheap in the global market, and Tenten, PaVietnam, Azdigi, Inet in Vietnam.
Pay attention to set the DNS records with correct type and host that match your needs.
Example on Godady
Example on Pavietnam
The addition of DNS addresses may take from 5 minutes to 30 minutes to propagate, depending on your domain provider and its speed. To check if the DNS has propagated, open CMD on your computer by presssing Windows key + R or go to Start > Run, then type CMD
Type the command: Ping domain.com (with a space, replace domain.com with your domain name)
If the returned IP matches your VPS IP address, then it’s successful. If request times out or the IP differs from your VPS IP, wait a moment.
#4. Install new website
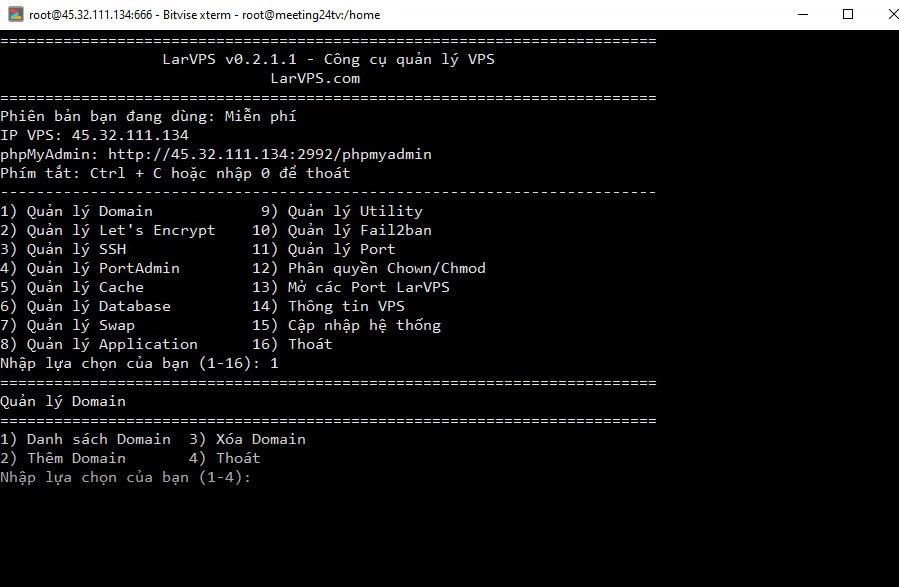
Step 1: Open Bitvise, enter IP, root password, and SSH port as in step 2, then access the management interface. Type larvps to open the manager. It will lead you to LarVPS management interface.
Step 2: Type 1 to enter domain management. In the domain management interface, press 2 to add a domain.
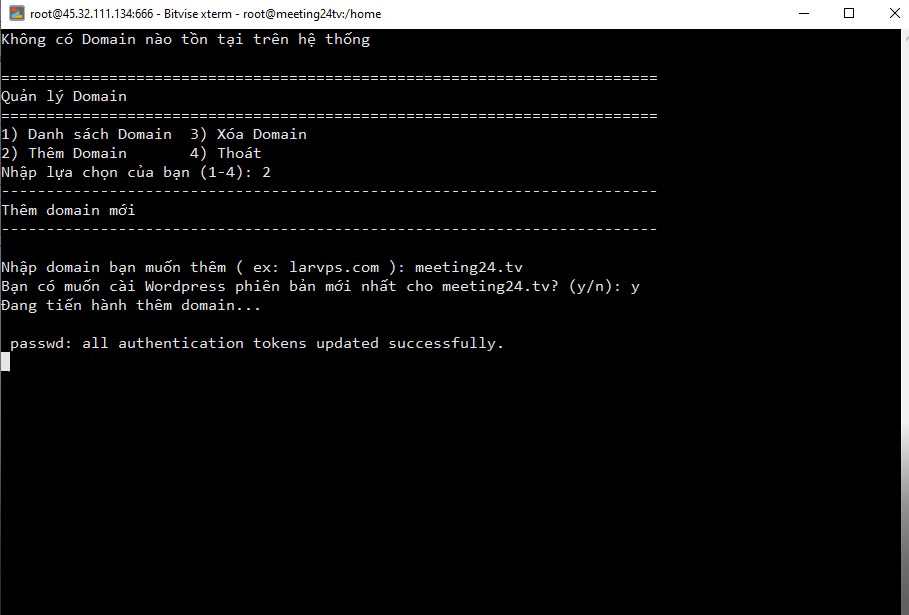
Step 3: Enter your domain name and click Y to accept default WordPress installation. Wait a moment until WordPress is installed for the domain.
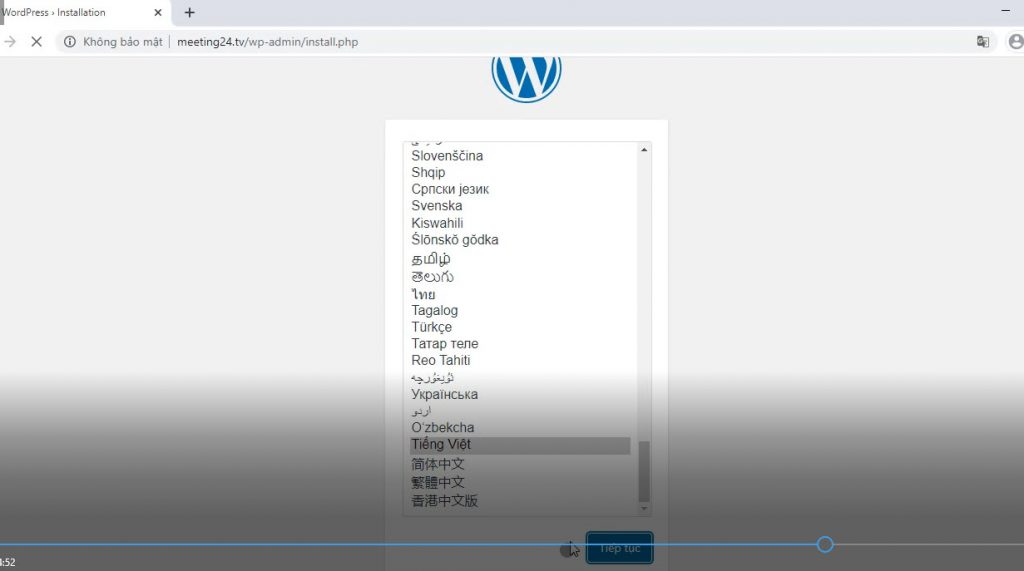
Step 4: Open your browser, preferably with a guest window in Chrome to avoid cache and cookies. Access the domain, choose Vietnamese language, then continue.
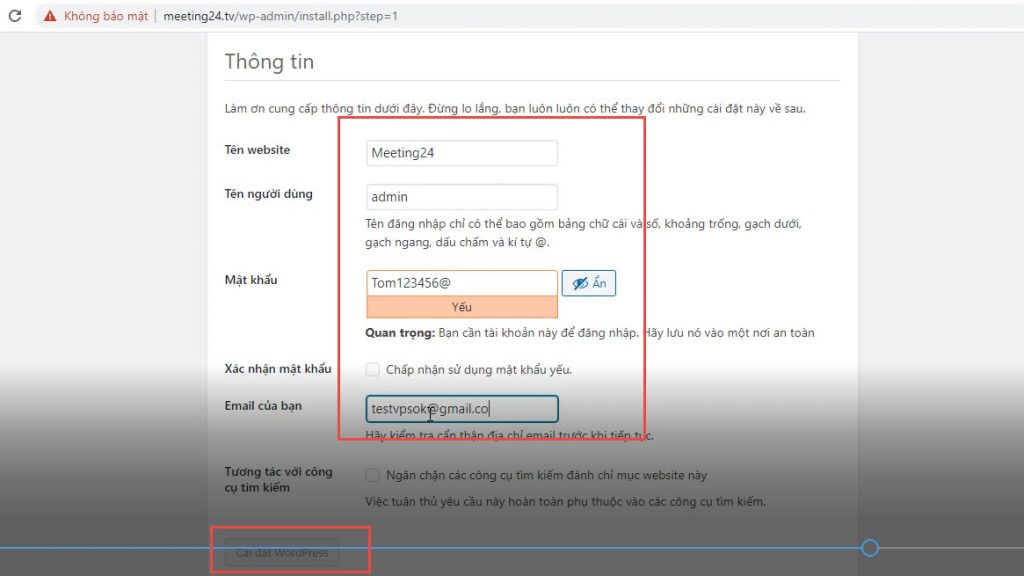
Step 5: Enter some optional parameters; they are mostly unused because I will restore the old website later, so these are for initial setup only. After entering, click Install WordPress. Done.
#5. Restore Old Website Data
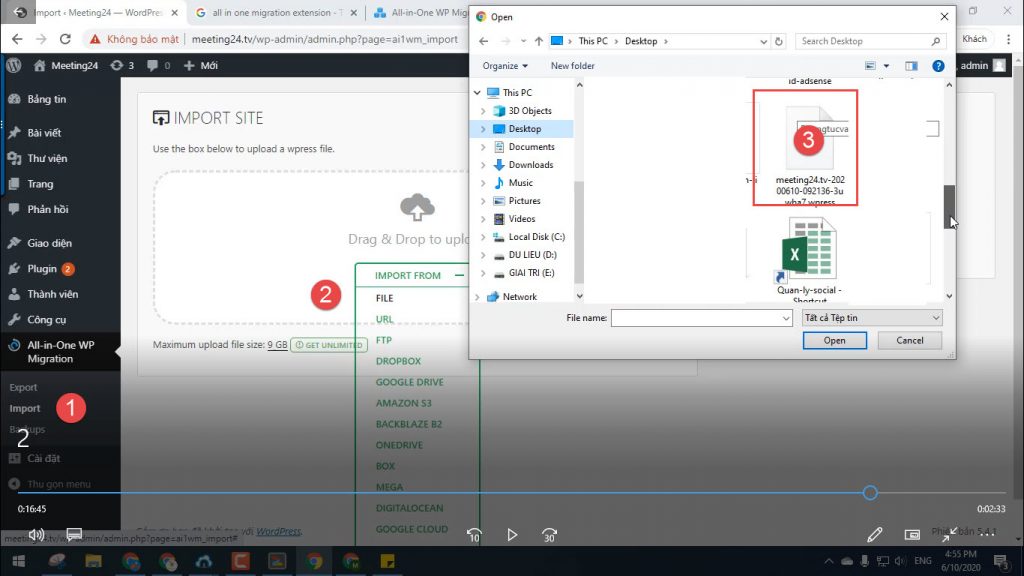
Log in to the new website’s wp-admin. Download the All In One Migration plugin that allows restoring up to 9Gb from the previously shared version and upload it to wp-admin of the new site.
Then, go to the menu, select Import > File, find your backup file, and click Process. Data restoration is complete, and the website will look like the old one in HTTP format.
#6. Upgrade to HTTPS and Fix Errors if Any
After restoring, the site uses HTTP. To switch to HTTPS, go to LarVPS management, select option 2: Manage Lets Encrypt (SSL—HTTPS). Then press 1 to add and run it. After completion, reload your browser with F5 to confirm the website has fully restored to HTTPS.
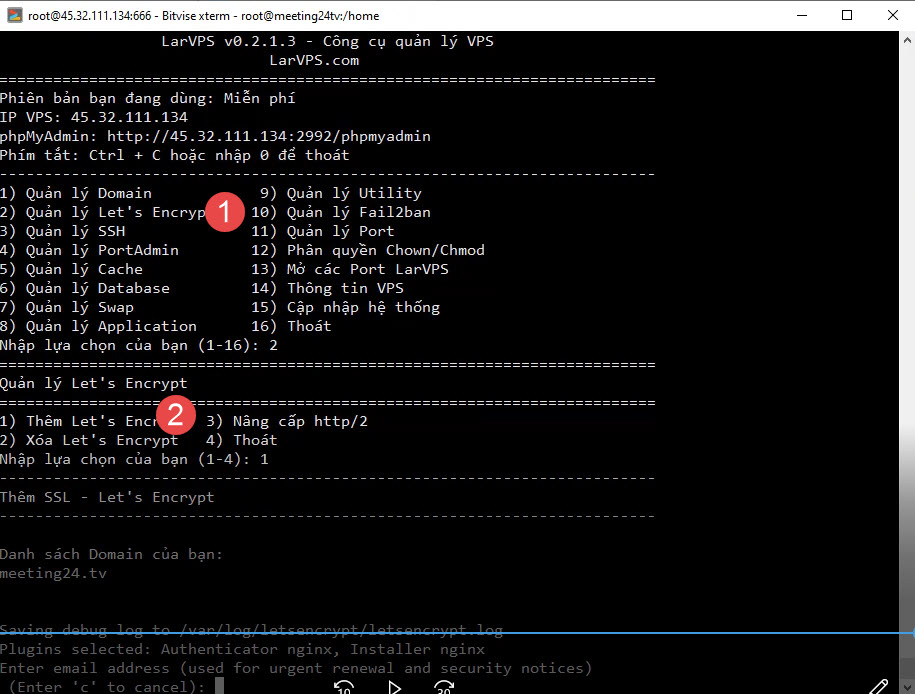
If errors occur, it might be due to permissions issues related to Chown/Chmod. Return to LarVPS management and choose option 12 to fix permissions.
If you cannot do it, you can watch a detailed video tutorial.
Video tutorial for transferring websites from Hosting to Hosting or VPS
Thus, I have finished guiding you on how to use Vultr VPS and LarVPS to transfer websites from hosting to VPS easily without coding skills.
If this guide is helpful, feel free to share it for everyone to learn.


