Are you looking for the most effective way to disable Windows Defender on Windows 10 permanently or temporarily? You’re in the right place. This updated 2025 guide merges all proven methods—old and new—into a single, complete resource.
Whether you want to install third-party antivirus software, prevent Defender from deleting activation tools, improve performance on low-end PCs, or simply avoid false virus alerts, this guide covers everything you need.
In this article, you will learn:
- What Windows Defender is and whether you should disable it
- Reasons why Defender may block your files or slow your PC
- All working methods to disable Defender: Settings, Group Policy, Registry, software tools
- How to re-enable Defender if needed
- Common errors & troubleshooting
- How to protect your PC after disabling Defender
Let’s get started!
What Is Windows Defender? Should You Disable It?
Before diving into how to disable Windows Defender, it’s important to understand what it does and when disabling it becomes necessary.
Windows Defender (now Microsoft Defender Antivirus) is the built-in, free antivirus software included in Windows 10. It provides essential protection against viruses, ransomware, trojans, and spyware — with no need to install third-party tools.
For most users, Defender is more than enough. However, there are situations where you may need to disable it:
- You want to install another antivirus program (Defender conflicts with it)
- You use activation tools or utilities that Defender falsely flags as viruses
- You see the error “Operation did not complete successfully because the file contains a virus or potentially unwanted software.”
- Defender deletes files automatically before you can use them
- Your PC is slow because Defender is using high CPU during background scans
In these cases, disabling Windows Defender—temporarily or permanently—may be necessary.
Tip: If your computer constantly forces Windows Updates and slows down, you may also want to read: How to disable Windows 10 updates
Is It Safe to Disable Windows Defender?
Disabling Windows Defender removes your primary real-time protection. This means your PC becomes more vulnerable to:
- Ransomware attacks
- Trojan infections
- Keyloggers or spyware
- Unauthorized remote control
Therefore, only disable Defender if you fully understand what you’re doing, and always install a reliable replacement antivirus program afterward.
Recommended alternatives:
- Kaspersky
- Bitdefender
- Norton
- ESET
- Avast
Now that you understand the risks, let’s move on to the methods.
All Working Methods to Disable Windows Defender on Windows 10 (2025)
This guide includes all possible approaches, from simplest to most advanced:
- Temporarily disable Defender via Windows Security (Settings)
- Permanently disable Defender via Group Policy Editor (Win 10 Pro/Enterprise/Education)
- Permanently disable Defender via Registry Editor (all Windows editions, including Home)
- Disable Defender using trusted third-party tools
Each method includes updated screenshots, step-by-step instructions, warnings, and troubleshooting notes.
Method 1: Temporarily Disable Windows Defender via Settings (Windows Security)
This method is the easiest and safest. Ideal when you only need Defender turned off for a short period—for example, during software installation or while running tools that Defender usually blocks.
Steps:
- Press Start → search for Windows Security → open it
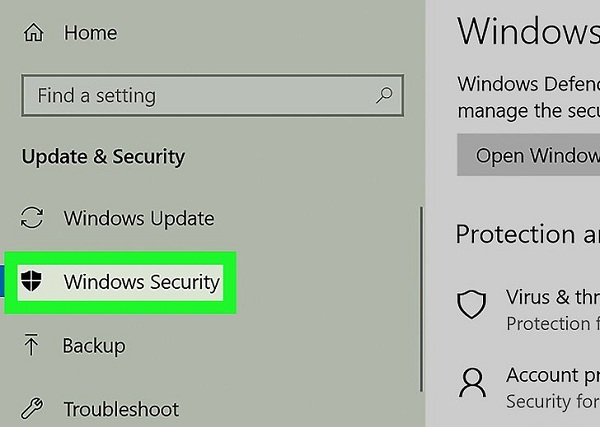
- Select Virus & threat protection
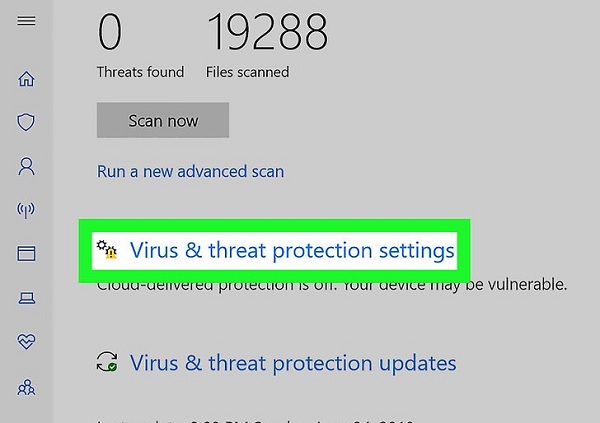
- Scroll down and click Manage settings
- Turn off Real-time protection (Defender will warn you)
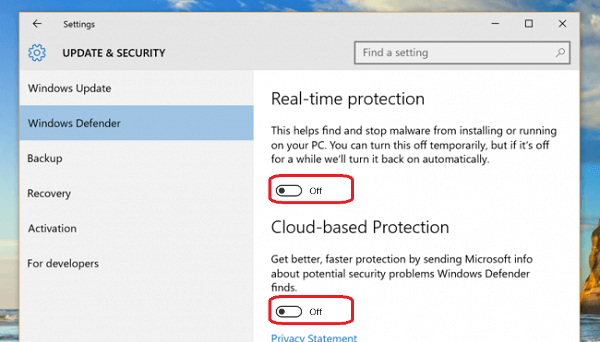
- Optional: Turn off Cloud-delivered protection to prevent auto-blocking
Important: This method is temporary — Windows Defender will automatically re-enable itself after some time or after restarting your PC.
Method 2: Permanently Disable Windows Defender via Local Group Policy Editor
If you’re using Windows 10 Pro, Enterprise, or Education, you can completely disable Windows Defender using the Local Group Policy Editor. This method prevents Defender from automatically turning itself back on — unlike the temporary Settings method.
Warning: This method does NOT work on Windows 10 Home. If you’re using the Home edition, skip to Method 3: Disable via Registry Editor.
Steps to disable Defender using Group Policy:
- Press Windows + R → type
gpedit.msc→ press Enter.

- Navigate to the following path:
Computer Configuration > Administrative Templates > Windows Components > Microsoft Defender Antivirus - Find and double-click on:
Turn off Microsoft Defender Antivirus
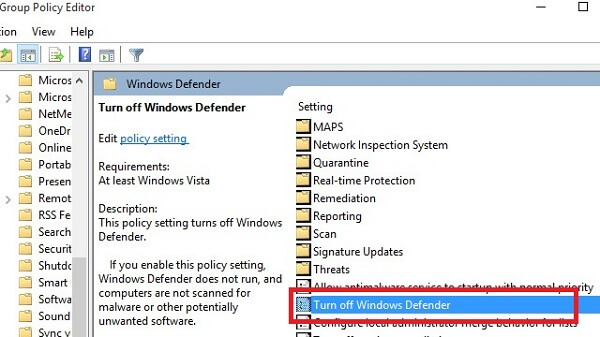
- In the configuration window, choose: Enabled → Apply → OK
- Restart your computer to apply changes.
Important Notes:
- Choosing Enabled disables Defender completely.
- To re-enable Defender later, return to the same option and choose Not Configured or Disabled.
- Editing Group Policy incorrectly may affect system behavior — only modify the mentioned setting.
Method 3: Permanently Disable Windows Defender via Registry Editor (Works on All Windows Versions)
This is the most powerful method because it works on all editions of Windows, including Windows 10 Home, which does not include the Group Policy Editor. The Registry method allows you to disable Defender at the system level.
⚠ WARNING: Editing the Registry incorrectly can cause instability. Always create a backup first.
Step-by-step: Disable Defender via Registry Editor
- Backup your registry:
Openregedit→ select File → Export → save the backup. - Press Windows + R → type
regedit→ press Enter.
Open regedit - Navigate to the following key:
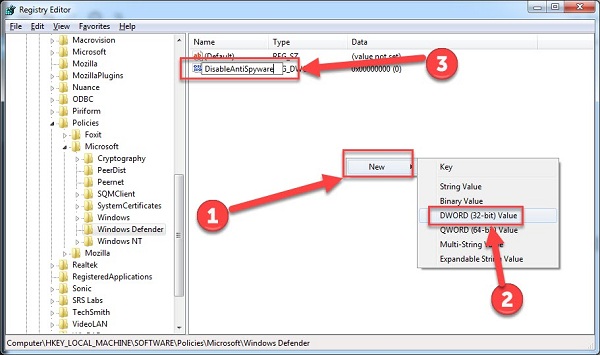
Navigate to the following key HKEY_LOCAL_MACHINE\SOFTWARE\Policies\Microsoft\Windows Defender
- Look for the key DisableAntiSpyware:
- If it exists → double-click → set Value data = 1
- If it does NOT exist → right-click → New → DWORD (32-bit) Value → name it
DisableAntiSpyware→ set value 1
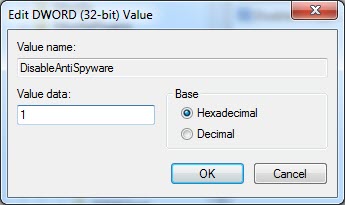
DisableAntiSpyware
- Restart your computer to finalize the change.
After reboot:
- Windows Defender real-time protection will be fully disabled.
- The service
WinDefendwill stop running. - Defender won’t automatically reactivate unless you reverse the registry setting.
Common Registry Issues & Fixes:
- Cannot edit key: Run regedit as Administrator.
- Key resets after restart: Check if you installed a third-party antivirus (they override Defender policies).
- Regedit blocked: Your system may be restricted by Group Policy or security software.
Method 4: Disable Windows Defender Using Third-Party Tools (Fastest Method)
If you prefer a simple, one-click solution without editing system files, you can use third-party utilities designed to turn Defender on/off instantly.
These tools are especially useful for:
- Non-technical users
- Technicians needing fast toggling
- Systems running Windows 10 Home
Recommended Tools:
1. Defender Control (by Sordum.org)
- Lightweight (< 1MB)
- Turns Defender ON/OFF with one click
- Simple, clean interface
2. Simple Disable Defender
- Disables all Defender components (including Tamper Protection)
- Provides restore options
- Useful for advanced scenarios
⚠ Important Safety Notes:
- Only download from official sources to avoid malware
- Scan downloaded files with VirusTotal before using
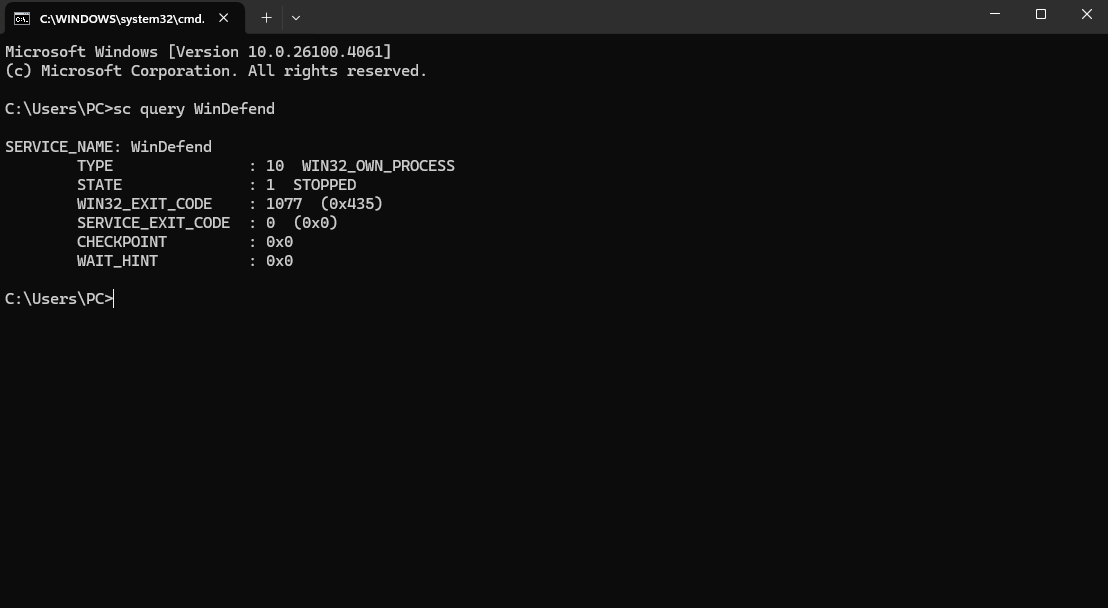
- After disabling Defender, verify via:
- Windows Security dashboard
sc query WinDefend(Command Prompt)
Common Issues When Disabling Windows Defender (Troubleshooting & FAQs)
During the process of disabling Windows Defender, users often encounter errors — especially when using Windows 10 Home, restricted environments, or systems with third-party security software. Below are the most common issues and how to fix them quickly.
1. “Why can’t I find the option to turn off Defender in Settings?”
- Windows 10 only allows temporary disabling via Settings.
- For permanent disabling, use:
- Group Policy Editor (Windows 10 Pro+)
- Registry Editor (all versions)
2. “gpedit.msc doesn’t open — what should I do?”
- You’re probably using Windows 10 Home, which does not include the Group Policy Editor.
- Use the Registry method instead.
- Check your account permissions: ensure you’re using an Administrator account.
3. “Registry Editor is blocked or showing an error.”
- Run regedit as Admin.
- Check if your organization or antivirus software has locked Registry access.
- Repair system files via Command Prompt:
sfc /scannow
4. “Windows Defender turns back on automatically — why?”
- Defender auto-reactivates as part of Windows’ built-in protection.
- To prevent automatic reactivation:
- Enable “Turn off Microsoft Defender Antivirus” in Group Policy
- Set
DisableAntiSpyware = 1in Registry
- Also, disable Tamper Protection (Windows Security → Manage Settings).
5. “How do I know if Defender is fully disabled?”
- Check Windows Security → Virus & threat protection:
- Real-time protection = Off
- No red/yellow warning icons
- Or use PowerShell:
Get-MpComputerStatus - If the line
RealTimeProtectionEnabled = Falseappears → Defender is fully disabled.
6. “Defender deletes my activation tools even after disabling. What now?”
- Make sure Tamper Protection is OFF.
- Use the Registry method to disable Defender at the system level.
- Extract your file inside a compressed ZIP to reduce detection risk.
Which Method Should You Choose? (Comparison Table)
The table below helps you pick the best way to disable Windows Defender depending on your needs, skill level, and Windows edition.
| Method | Advantages | Disadvantages | Recommended For |
|---|---|---|---|
| Temporary Disable (Settings) | Simple, safe, no system modification needed | Defender turns back on automatically | Casual users needing short-term disabling |
| Group Policy Editor | Permanent, stable, easy to manage | Only available on Windows 10 Pro/Enterprise | Advanced users, IT admins |
| Registry Editor | Works on all Windows editions | Risky if misconfigured, less user-friendly | Experienced users or those following a guide |
| Third-party Tools | Fast, user-friendly, one-click | Potential malware risk if downloaded from unofficial sites | Non-technical users wanting convenience |
Softbuzz Recommendation:
- Use Settings if you only need temporary disabling.
- Use Group Policy if available — it is the safest permanent method.
- Use Registry only when GPO is unavailable.
- Use Defender Control for fast toggling (download from official sources only).
Safety Tips After Disabling Windows Defender
After turning off Defender, your system becomes more vulnerable unless you apply the following protective measures:
- Install a reliable antivirus alternative: Bitdefender, Kaspersky, Norton, or ESET.
- Keep Windows updated to patch security vulnerabilities.
- Enable Windows Firewall or install a third-party firewall.
- Avoid downloading software from untrusted sources.
- Regularly back up important data using:
- Windows Backup
- File History
- Cloud storage (OneDrive, Google Drive)
How to Re-enable Windows Defender in Windows 10
There may be situations where you previously disabled Windows Defender for testing, software installation, or troubleshooting — but now need to reactivate it to restore system protection. Depending on the method you used to disable Defender, the process to enable it again will differ.
1. Re-enable Defender via Settings
This works if you turn off Windows Defender temporarily from Windows Security.
- Open Windows Security.
- Select Virus & threat protection.
- Click Manage settings under “Virus & threat protection settings”.
- Turn on:
- Real-time protection
- Cloud-delivered protection
Once enabled, Defender will automatically resume real-time scanning and threat detection.
2. Re-enable Defender via Group Policy Editor
Use this method if you disabled Defender permanently using Group Policy.
- Press Windows + R → type gpedit.msc.
- Navigate to:
Computer Configuration → Administrative Templates → Windows Components → Microsoft Defender Antivirus - Open Turn off Microsoft Defender Antivirus.
- Select:
- Not Configured — recommended
- Or Disabled — also restores Defender
- Click Apply → OK.
- Restart your computer.
After rebooting, Windows Defender should automatically re-activate.
3. Re-enable Defender via Registry Editor
If you used the Registry method to disable Defender, follow these steps:
- Press Windows + R → type
regedit. - Navigate to:
HKEY_LOCAL_MACHINE\SOFTWARE\Policies\Microsoft\Windows Defender - Find the key:
DisableAntiSpyware - Do one of the following:
- Set
Value data = 0 - Or delete the DWORD entirely
- Set
- Restart your computer.
After restarting, Defender will automatically return to active mode unless another antivirus program is controlling protection.
4. Re-enable Defender through third-party tools
If you used apps like Defender Control or Simple Disable Defender, simply:
- Open the application.
- Select Enable Windows Defender.
- Restart your PC if required.
If the tool doesn’t restore Defender automatically, uninstalling the tool will typically trigger Windows to re-activate its built-in antivirus.
When Should You Turn Windows Defender Back On?
You should re-enable Windows Defender in the following cases:
- You no longer need the third-party antivirus software.
- You deleted or uninstalled the activation or testing software that required disabling Defender.
- You notice unusual behavior, lag spikes, or unknown processes — possible signs of infection.
- You simply want the system to remain protected by default Windows Security features.
Since Defender provides real-time protection with minimal performance impact, reactivating it is recommended once your temporary task is complete.
Conclusion
Disabling Windows Defender in Windows 10 can provide flexibility when you need to install certain applications, run special tools, or avoid false-positive detections. However, Defender is a critical part of Windows Security — meaning it should only be turned off intentionally and with proper safety measures.
Throughout this comprehensive guide, you’ve learned:
- What Windows Defender is and when it should or should not be disabled
- How to temporarily or permanently disable Defender using:
- Windows Security Settings
- Group Policy Editor
- Registry Editor
- Third-party tools
- How to troubleshoot common issues and errors
- How to choose the best method based on your system and skill level
- Essential safety measures after turning off the Defender
- How to restore Windows Defender when needed
By following this guide, you can confidently manage Windows Defender on your system — balancing flexibility, compatibility, and security. If you want more optimization tips and Windows tutorials, don’t forget to visit Computer Tricks.For more technical guides, software tools, and troubleshooting tips, explore Softbuzz.

