Adjusting line spacing in Word will help you create a professional-looking document in Microsoft Word not only in presentation but also in content layout. However, not everyone knows the correct way to adjust line spacing in Word. Therefore, to help everyone gain more knowledge on this issue, let’s explore the detailed methods in the article below with Softbuzz.
Overview of Line Spacing in Word
Microsoft Word (or simply Word) is a popular word processing software used by office workers, students, and learners. It allows users to work with raw text, colorful font effects, etc. Additionally, Word also provides graphic images, effects like audio, video, etc. If you do not have a standard Word suite, you can download it for free from.
It can be said that Word is an indispensable tool for computer users. However, as cultural life becomes more advanced, users are required to know how to present Word documents correctly and clearly. Therefore, adjusting line spacing in Word is unavoidable.

Adjusting line spacing in Word 2010 will make it easier for readers to read your document without eye strain. It provides a comfortable feeling for viewers. Proper line spacing will make your document engaging and inviting to read. This is an essential step when preparing work reports, project reports, or progress updates.
Read more:
Line spacing is the distance between lines in a paragraph. In Word, users can freely adjust line spacing with options such as:
- Single spaced (one line high).
- Double spaced (two lines high).
- The default distance in Word is 1.08 cm (greater than one line high).
In the image below, you can see the difference in line spacing for each paragraph.

If you are unsure how to properly adjust line spacing in Word, follow the steps below.
Guide to Adjust Line Spacing in Word 2010 and 2013
Using the Built-in Line Spacing options in Word 2013
Step 1: Highlight the paragraph you want to adjust. On the Home tab in your Word interface, select the Line and Paragraph Spacing button to open the line spacing options in Word 2016.

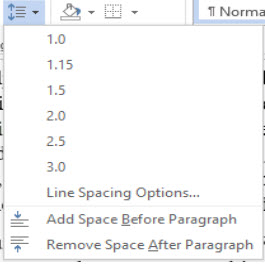
Step 2: After clicking the Line and Paragraph Spacing button, a menu will appear as follows:

Options 1.0 – 1.15 – … are preset line spacing options that allow you to choose your preferred spacing. Each value corresponds to a specific line spacing distance. In other words, these are default measurement options that are readily available.
Step 3: Select the desired standard line spacing value, and the highlighted text will immediately adjust to that spacing.
These steps will help you properly set line spacing in all versions of Word. Alternatively, if you want to set custom line spacing, see the method below.
Customizing Line Spacing
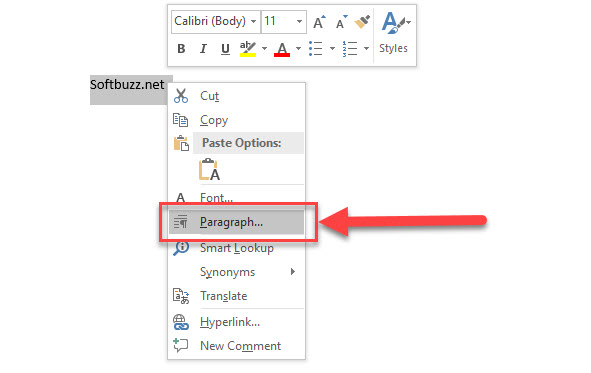
Step 1: Highlight the paragraph you want to modify. Right-click and choose Paragraph.

Step 2: In the Paragraph menu, click the Line Spacing Options tab. Then, under the Indents and Spacing tab, enter your desired spacing parameters.

Note in the Spacing section:
- After: space below the paragraph
- Before: space above the paragraph
- Line Spacing: the gap between lines
Typically, users set a minimum paragraph spacing of 6pt, with line spacing usually from 15pt upwards. The standard line spacing is often set to 1.5 lines (1.5 lines).
After entering your desired parameters, click OK to apply the new line spacing.
These instructions cover all necessary steps to properly adjust line spacing in Word. Remember, these settings are often default but can be customized for formal documents.
Note on Line Spacing in Word
Here are some tips for adjusting line spacing effectively:
- Choose a moderate spacing to make the text easier to read.
- Keep spacing above and below paragraphs consistent for a neat appearance.
- If your document includes tables, applying these settings will help balance the layout.
Conclusion
Hope these tips help you understand how to adjust line spacing in Word. You can apply these methods in any version of Microsoft Word. For further questions, visit the website: https://softbuzz.net for quick and timely assistance.


