Facebook has become familiar to everyone, spreading widely across the globe, and Vietnam is no exception. Its enormous user base makes Facebook a fertile ground for building brands, connecting communities, or simply sharing passions. Many businesses, celebrities, and even online sellers see Fanpage as an indispensable channel. However, not everyone is clear about the steps to create their own page. This article will guide you through how to create a Facebook Fanpage in a super simple, detailed step-by-step manner.
Why is creating a Facebook Fanpage important?
With over one billion active monthly users, Facebook is an extremely potential platform for reaching customers and audiences. Creating a Facebook page (Fanpage) allows you to:
- Direct connection: Easily interact, get feedback, and build relationships with those interested in you, your products, or services.
- Brand building: Create a professional space to share information, update news, upload engaging content (images, videos), thereby increasing brand awareness.
- Effective marketing tools: Fanpage provides powerful advertising tools that help you target the right audience, promote business, or disseminate messages. Many small and large companies consider it an official communication and marketing channel.
Knowing how to create and manage Fanpages effectively, especially how to make Facebook pages for sales, will open up many development opportunities, whether you’re a business or an individual.
Guide to creating a Facebook Fanpage on mobile
Creating a Fanpage right on your smartphone is extremely convenient. Just follow these steps:
Step 1: Open the Facebook app on your phone, log into your personal account. Tap the menu icon (usually three horizontal lines) at the top right (Android) or bottom right (iOS). Select Pages.
Step 2: Tap the Create button at the top left, then choose Get Started.
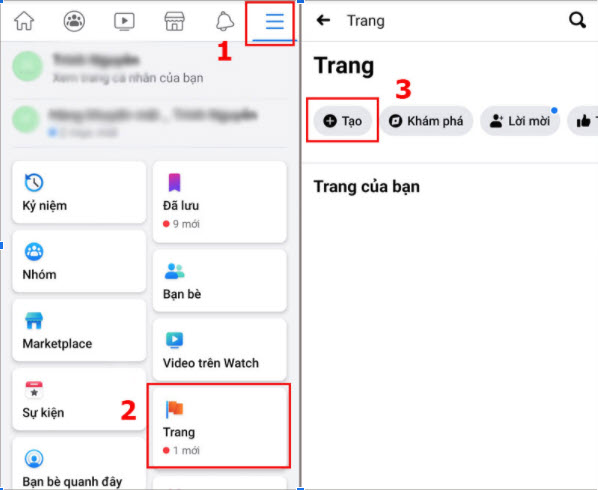 Facebook interface on mobile with option to create a new Page.
Step 3: Name your Fanpage. Choose a memorable name related to the content or brand you want to build. Click Next.
 Enter name for new Facebook Fanpage on mobile app.
Step 4: Choose the category that best describes your page (e.g., Personal Blog, Product/Service, Shopping & Retail, Art, Musician/Band…). You can select multiple categories. Click Next.
 Select appropriate category when creating Facebook Fanpage.
Step 5: If you have a website, enter the address here. If not, you can choose Skip. Linking a website increases credibility and attracts more traffic. Click Next.
 Add website link to Facebook Fanpage if available.
Step 6: Add a profile picture (avatar) and cover photo for the page. This is the face of your Fanpage, so choose high-quality images that fit Facebook’s standard sizes for the best display. After adding images, click Done.
Step 7: Your basic page has been created. The next step is to complete the information. You should Create a username for the page (e.g., @YourPageName). A username makes it easier for people to find and tag your page.
Step 8: Click Add Button to select a Call-to-Action button (e.g., Send Message, Call Now, Book Now, Learn More…). This button will stand out on the page, encouraging user interaction.
Guide to creating a Facebook Fanpage on desktop
If you find desktop steps more convenient, follow these:
Step 1: Access Facebook on a web browser. From the left menu or the dropdown menu from the arrow icon at the top right, find and click Pages. Or click the Create (+) button on the top toolbar and select Page.
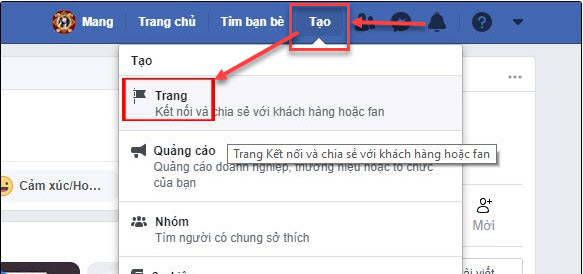 Create menu on Facebook desktop interface with Pages option.
Step 2: Facebook will ask you to enter basic info for the page. First is Page Name (required) and Category (required, choose the most suitable). You can also add a Description (optional but recommended) to introduce your page. Click Create Page.
 Choose the type of Facebook Fanpage: Business or Community.
Step 3: After the page is created, you will be prompted to Add Profile Picture and Add Cover Photo. Upload high-quality images with correct dimensions to make the page look professional. Click Save.
 Enter page name, category, and address when creating Fanpage on desktop.
Step 4: Your page is ready. Now, complete other important information. In the page management interface, find the Edit Page Info or About section.
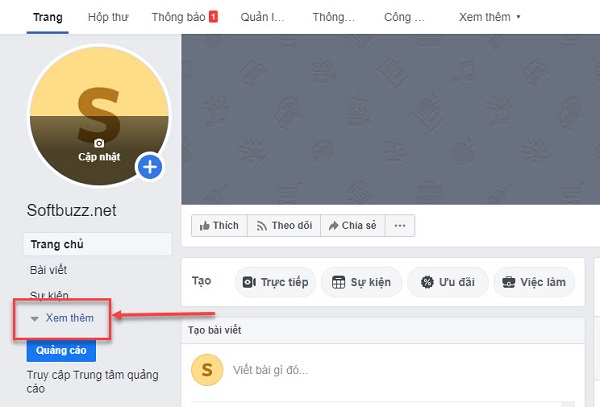 Access the About section to edit Facebook Fanpage info.
Step 5: Here, you can (and should) Create a Username (@username) for the page. Add contact info such as phone number, email, website, address (if it’s a business/store), opening hours, and other details. The more complete the info, the more trustworthy your page appears.
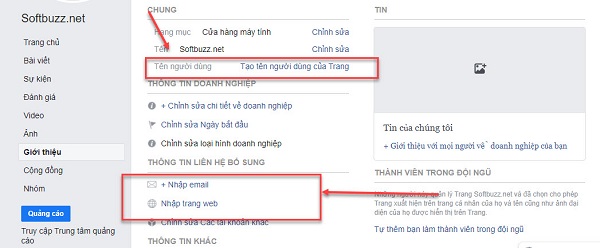 Edit username and add detailed info for your Fanpage.
Step 6: Click + Add Button below the cover photo to set up a Call-to-Action button for your page, similar to the mobile version.
Conclusion
That’s it! With just a few simple steps, whether using a phone or a computer, you can create a complete Facebook Fanpage by yourself. Creating a page is just the first step; much more important is how you build content, interact with the community, and develop your page effectively. Wishing you success in building your presence on Facebook!


