How to partition hard drive Windows 10 without losing data:
-
Back up all important files.
-
Check drive health and disable BitLocker.
-
Open Disk Management.
-
Right-click a volume and choose “Shrink Volume.”
-
Use unallocated space to create a new partition.
The safest way to partition a hard drive in Windows 10 without losing data is to prepare first — back up your files, check drive health, and disable BitLocker to avoid errors. In 2025, enhanced Disk Management tools, along with reliable DiskPart commands and trusted third-party software, make the process safer and easier than ever.
Partitioning your drive can help organize files, improve backups, and even run multiple operating systems — all without risking your existing data if done correctly. At Softbuzz, we’ve tested the latest Windows utilities and professional partitioning tools to ensure every method works smoothly and securely.
In this guide, you’ll learn:
-
Step-by-step methods to partition a hard drive without losing data in Windows 10.
-
How to use Disk Management, DiskPart, and proven third-party tools.
-
Expert precautions to prevent data loss and maintain peak drive performance.
Why and When to Partition Your Hard Drive in Windows 10
Knowing why and when to partition your hard drive is essential for making the most of your Windows 10 storage without risking data loss. Done correctly, partitioning can enhance organization, improve performance, and simplify backup management.
Key benefits of partitioning:
-
Better file organization – Separate work files, games, or multimedia into dedicated partitions for a cleaner, more efficient system.
-
Improved backup management – Keep a dedicated partition for backups to make recovery faster and more reliable.
-
Dual-boot systems – Install another operating system (e.g., Linux) alongside Windows 10 without affecting your main drive.
-
Performance optimization – Reduce file fragmentation and boost read/write speeds by managing data across partitions.
Common scenarios for partitioning:
| Scenario | Best Time to Partition |
|---|---|
| New laptop with a single drive | Organize work and personal data into separate partitions. |
| Low system drive space | Shrink the C: drive to create a dedicated data partition. |
| Dual-boot installation | Create a separate partition for Linux or another OS. |
| Backup and recovery | Set up a dedicated partition for faster, safer backups. |
When to avoid partitioning:
Skip partitioning if your hard drive shows error warnings, lacks a recent backup, or is encrypted (e.g., with BitLocker) in a way that could corrupt data during changes. Always assess drive health and back up important files before proceeding.
Precautions: Back Up and Prepare Before Partitioning
Even with Windows 10’s improved Disk Management tools in 2025, partitioning a hard drive without the right preparation can still lead to data loss, system errors, or compatibility issues. To ensure a safe process, follow these expert-recommended steps:
1. Back up your data first
-
Use Windows File History to protect personal files.
-
Create a full system image via Backup and Restore (Windows 7) for complete recovery if something goes wrong.
-
Store copies on cloud services like OneDrive or on an external hard drive for extra safety.
2. Create a system restore point
-
Open Create a restore point in the Control Panel.
-
Select your system drive (usually C:), click Create, and name it clearly (e.g., “Before Partitioning”).
-
This allows you to roll back system settings if an error occurs.
3. Check disk health
-
Run
chkdsk /fin Command Prompt (Admin) to detect and repair file system errors or use the Disk Cleanup utility in Windows 10 to free up space before shrinking a volume.” -
Use tools like CrystalDiskInfo to check S.M.A.R.T. data and ensure the drive has no signs of failure.
4. Update Windows and disable BitLocker
-
Install the latest Windows updates to ensure compatibility with partition changes.
-
Temporarily turn off BitLocker encryption to prevent partition conflicts or boot issues.
Expert Note:
According to Microsoft’s documentation and real-world troubleshooting cases, most partitioning failures occur due to skipped backups, ignored disk health checks, or changes made on unstable drives. Completing these steps greatly reduces the risk of losing data when creating, shrinking, or modifying partitions.
How to Partition Hard Drive Windows 10 Without Losing Data (Step-by-Step)
This step-by-step tutorial explains how to partition hard drive Windows 10 without losing data in 2025 using Windows built-in tools. Whether you want better file organization, to prepare for dual-boot, or to create a dedicated backup partition, following these steps ensures safety and compatibility.
1. Access Disk Management
-
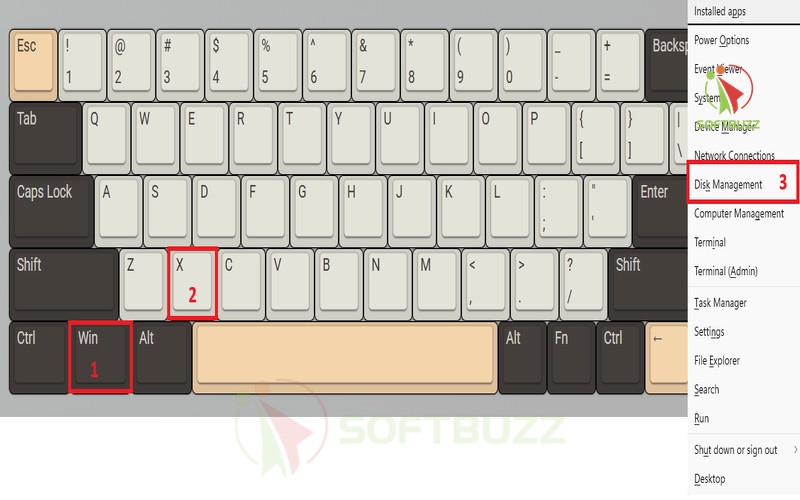
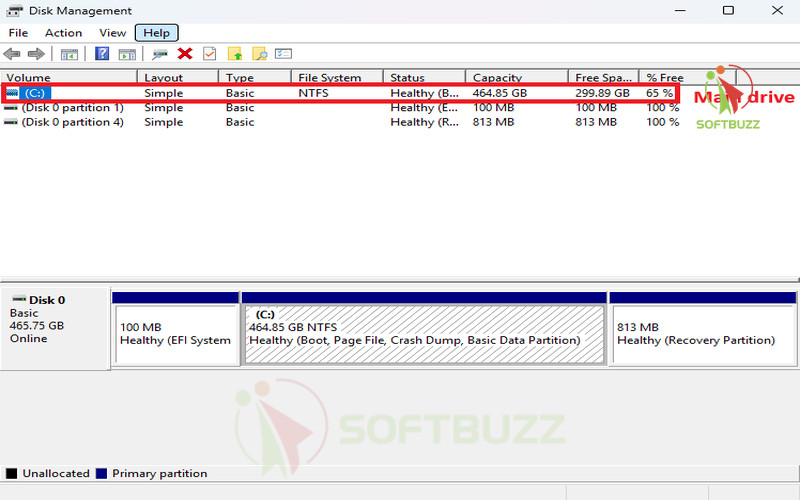
To start how to partition hard drive Windows 10 without losing data, press Win + X and select Disk Management. Review all drives and note your current partition layout to avoid mistakes.
-
Review all connected drives and partitions. Identify your main drive (Disk 0) before proceeding.
2. Shrink an Existing Partition
-
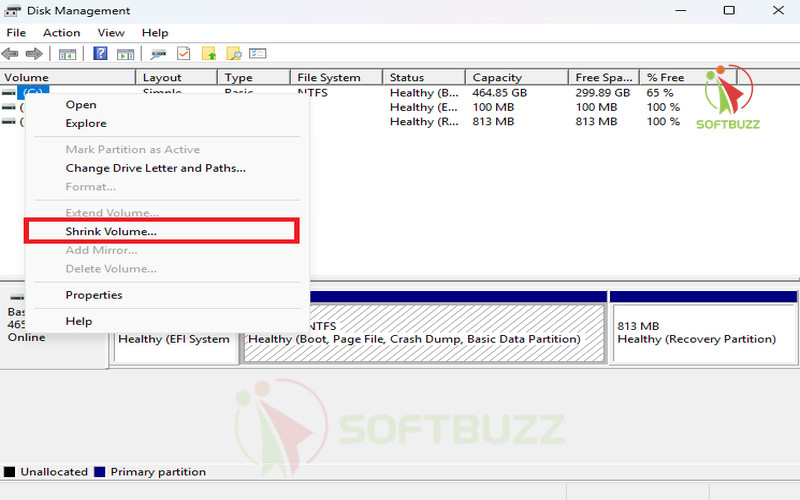
In Disk Management, right-click the C: drive (or another large partition) and choose Shrink Volume…
-
Enter the amount of space to free up and confirm.
-
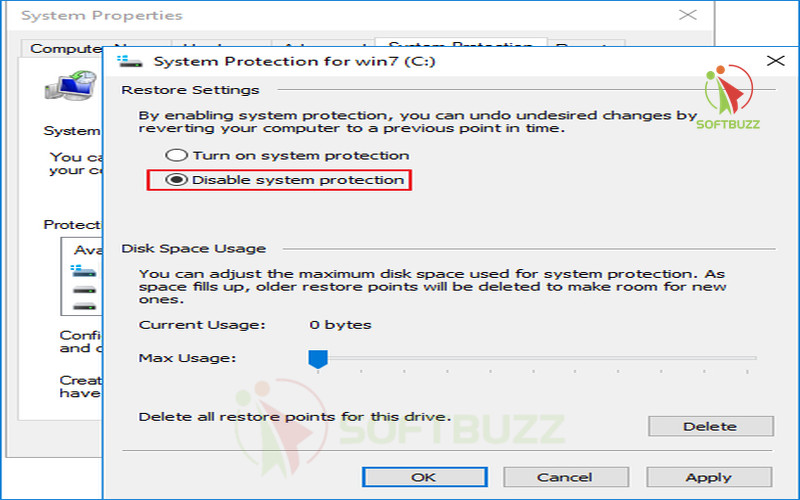
If Windows 10 cannot shrink enough space, defragment the disk, disable System Protection, or move large files.
3. Create a New Partition Without Data Loss
-
You’ll see an Unallocated area after shrinking.
-
Right-click and select New Simple Volume.
-
Follow the wizard to choose size, assign a drive letter, and format to NTFS for best compatibility.
4. Verify the New Partition in Windows 10
-
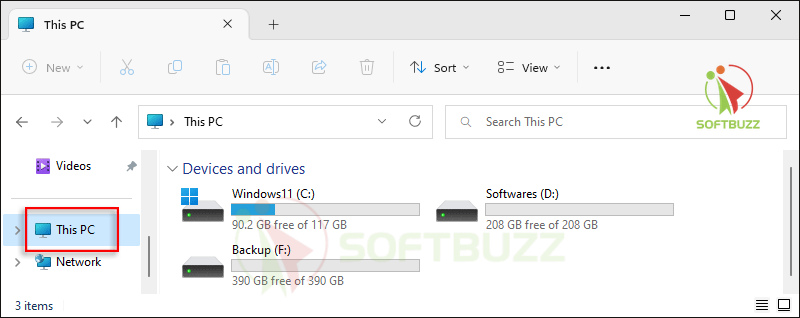
Open File Explorer → This PC to confirm your new partition appears with the correct drive letter and size.
-
You can now store files on this new partition without affecting existing data.
5. Safety Reminders for Hard Drive Partitioning
-
Avoid changing system-critical partitions like Recovery or EFI.
-
Double-check your selections before formatting to prevent data loss.
Pro Tip: For complex setups, use trusted tools like MiniTool Partition Wizard or EaseUS Partition Master for how to partition hard drive Windows 10 without losing data.
Using DiskPart Command Line (Advanced Method)
For power users who want more granular control, DiskPart offers a command-line method for how to partition hard drive Windows 10 without losing data. This is especially useful for scripting, managing hidden partitions, or working in environments where the Windows Disk Management interface isn’t available.
Step-by-Step: Partition Hard Drive in Windows 10 with DiskPart
-
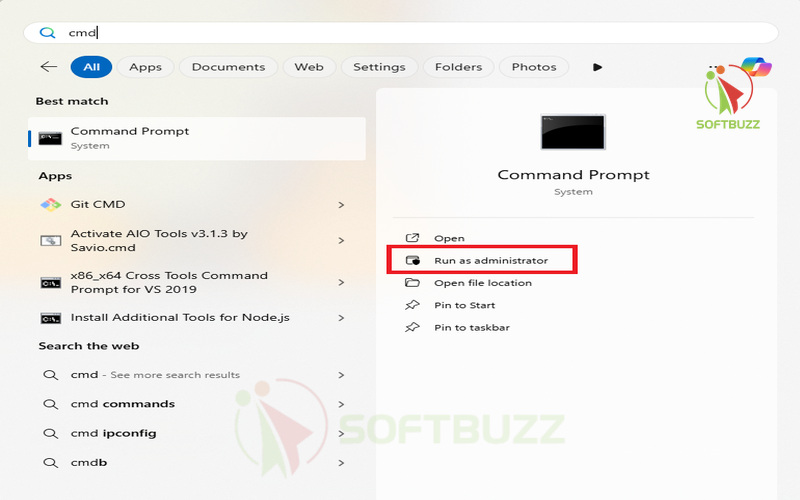
Open Command Prompt as Administrator
-
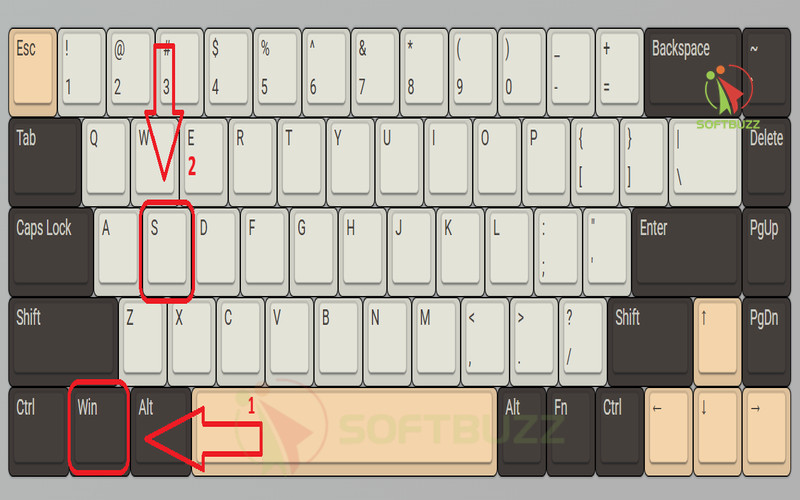
Press Win + S, type
cmd, right-click Command Prompt, and choose Run as administrator.
-
-
- Type
cmd, right-click Command Prompt, and choose Run as administrator.
- Type
-
Start DiskPart
-
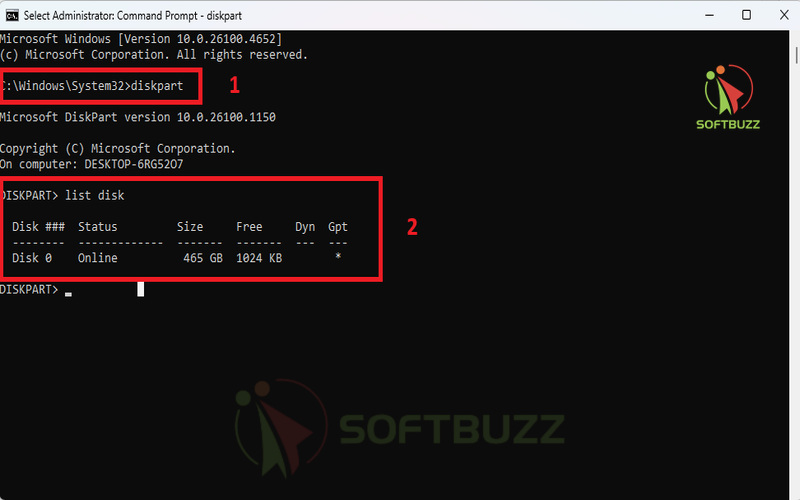
Type
diskpartand press Enter.
-
-
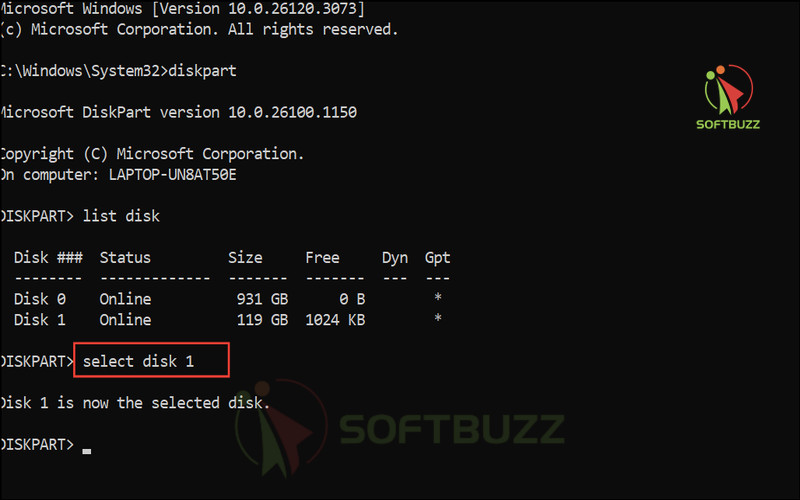
List All Disks
-
Type
list diskto display all connected drives. Identify your target disk number.
-
-
Select the Target Disk
-
Type
select disk X(replace X with your disk number).
-
-
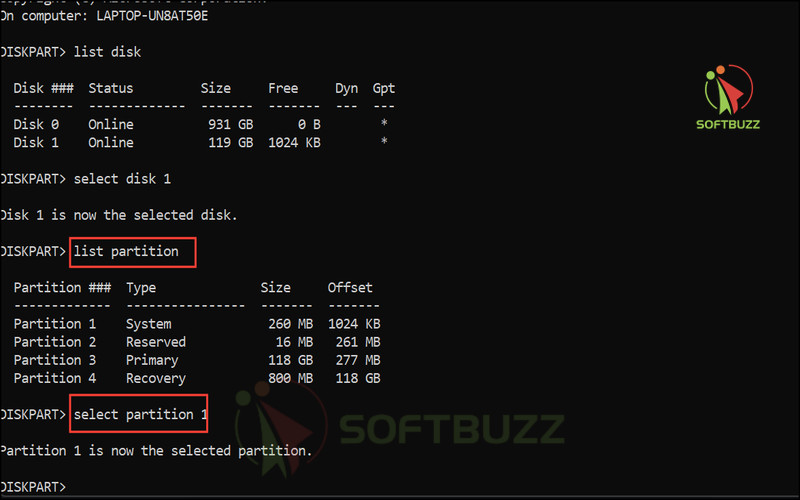
View Partitions on the Selected Disk
-
Type
list partitionto see all partitions.
-
-
Select the Partition to Shrink
-
Type
select partition Y(replace Y with your partition number).
-
-
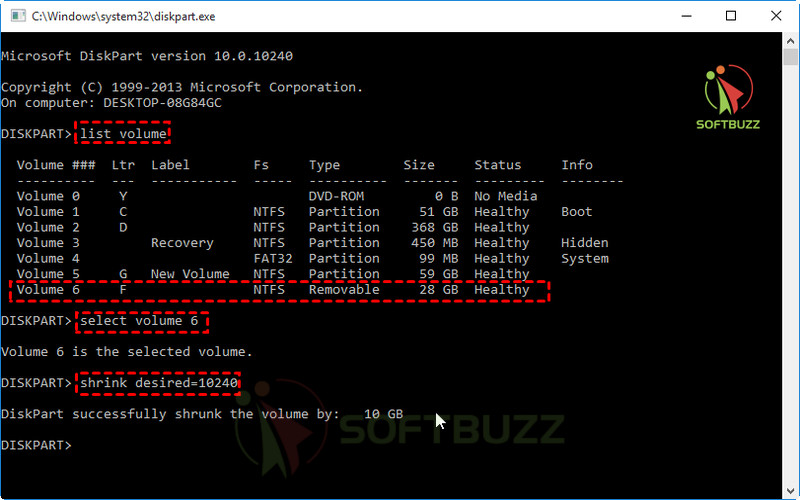
Shrink the Partition Without Data Loss
-
Type
shrink desired=SIZE(replace SIZE with the amount in MB).
-
-
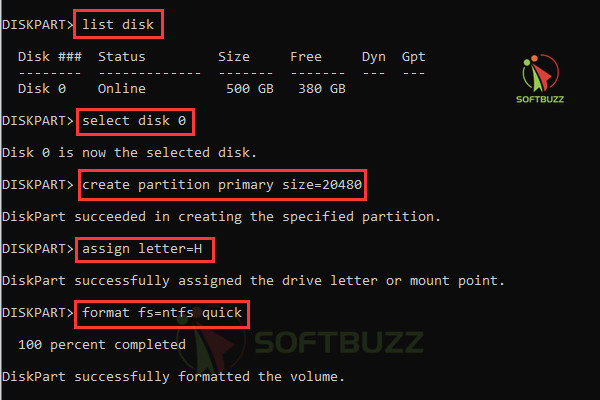
Create a New Partition
-
Type
create partition primary size=SIZEto allocate the new space.
-
-
Format the New Partition
-
Type
format fs=ntfs quickfor fast formatting.
-
-
Assign a Drive Letter
-
Type
assign letter=Z(or another unused letter).
-
Using Third-Party Partition Tools (For Special Cases)
When Windows built-in tools fall short—for instance, managing hidden or locked partitions—third-party applications like AOMEI Partition Assistant, MiniTool Partition Wizard, and EaseUS Partition Master offer enhanced capabilities.
Advantages include:
- Handling stubborn locked/system files.
- Moving partitions to free space.
- Recovering accidentally deleted partitions.
How to use: Download from official vendor sites, install safely, then launch the program. Use drag-and-drop sliders to resize or create partitions, and apply changes after reviewing.
Always verify the installation source to avoid malware risk. Use built-in snapshot or rollback features if available to revert problematic changes.
Comparison Overview:
Windows Disk Management is safest and free but limited in flexibility. DiskPart offers advanced control but requires command-line knowledge. Third-party tools deliver expanded features and user-friendly interfaces, though often with freemium licensing.
Troubleshooting: Common Partitioning Problems & Solutions
Even when following the correct steps for how to partition hard drive Windows 10 without losing data, you might encounter common issues. Understanding these problems — and their solutions — will help you resolve them quickly without risking files.
Q1: Why are the “Shrink” or “Extend” options grayed out in Disk Management?
A: This usually happens because of unmovable system files or a lack of contiguous free space. To fix it:
-
Run Disk Defragmenter or Optimize Drives to reorganize file placement.
-
Temporarily disable page files and hibernation to free up locked space.
-
Use reputable third-party partition software to move unmovable files.
Pro Tip: When learning how to partition hard drive Windows 10 without losing data, free space alignment is critical for smooth resizing.
Q2: Why is unallocated space not recognized or usable in Windows 10?
A: If unallocated space doesn’t show up as available:
-
Check the disk format — it may be MBR instead of GPT.
-
Convert from MBR to GPT without data loss using MBR2GPT.
-
Look for hidden recovery or OEM partitions that could be blocking expansion.
Q3: How do I fix filesystem incompatibilities without losing data?
A: If your new partition is FAT32 but you need NTFS:
-
Run
convert X: /fs:ntfs(replace X with your drive letter) to switch without deleting files. -
Be aware: Converting NTFS back to FAT32 requires reformatting, which will erase all data.
Q4: What should I do if I accidentally modify the wrong partition?
A:
-
Stop using the drive immediately to avoid overwriting files.
-
Use trusted recovery software like Recuva or EaseUS Data Recovery Wizard.
-
For critical data, consult professional data recovery services.
Expert Advice: Always double-check disk and partition numbers in Disk Management or DiskPart before proceeding, especially when applying how to partition hard drive Windows 10 without losing data methods in 2025.
After Partitioning: Verifying and Managing New Partitions in Windows 10
Once you’ve completed how to partition hard drive Windows 10 without losing data, it’s essential to verify that your new partitions are set up correctly and ready for use. Proper post-partition management helps ensure long-term stability, performance, and data security.
1. Verify Partition Creation
-
Open File Explorer → Go to This PC and confirm each partition is visible.
-
Check that drive letters, labels, and sizes match the specifications you set during partitioning.
-
Open Disk Management (Win + X → Disk Management) to confirm the new partitions are properly formatted and healthy.
2. Monitor Partition Health
-
Use Optimize Drives in Windows to defragment HDD partitions or trim SSDs for peak performance.
-
Check S.M.A.R.T. status with tools like CrystalDiskInfo to detect early signs of hardware issues.
-
Run chkdsk /f periodically to repair minor file system errors before they become serious.
3. Manage and Adjust Partitions Safely
-
If you need to merge, resize, or move partitions, use Windows Disk Management for simple changes or trusted third-party tools (MiniTool, EaseUS, AOMEI) for more complex adjustments.
-
Always back up your data first—even small changes can result in data corruption if interrupted.
-
Avoid frequent resizing to minimize wear on SSDs.
4. Practice Smart Space Management
-
Delete unused partitions cautiously to avoid removing critical recovery or system partitions.
-
Keep at least 15–20% free space on each partition for smooth performance.
-
Regularly review your storage layout to ensure partitions still fit your workflow.
Expert Tip: A well-maintained partition structure not only improves system organization but also extends your drive’s lifespan. By following safe management practices after partitioning, you’ll ensure your storage setup remains secure, efficient, and optimized for years to come. Regularly review your storage layout to ensure partitions still fit your workflow and help speed up Windows 10 startup where possible
Conclusion
Learning how to partition hard drive Windows 10 without losing data in 2025 is easier and safer than ever—provided you prepare properly and use the right tools. By backing up your files, checking drive health, and creating restore points before making any changes, you eliminate the biggest risks of data loss.
For everyday users, Windows Disk Management offers a reliable, built-in solution. For more advanced needs—such as moving system files, creating complex layouts, or managing hidden partitions—DiskPart or reputable third-party software like MiniTool or AOMEI Partition Assistant can deliver additional flexibility.
By understanding common partitioning issues, applying the troubleshooting tips in this guide, and following our expert safety checklist, you can:
-
Organize files for a cleaner and faster system
-
Optimize backups for quicker recovery
-
Set up dual-boot configurations without disrupting existing data
With 2025’s improved partitioning safety features in Windows 10, even first-time users can confidently manage disk space without sacrificing stability or performance. Treat your storage layout like digital real estate—plan it well, maintain it regularly, and it will serve you securely for years to come.
Next Steps:

