Leveling guide Diablo 2: Resurrected (D2R) remains a cornerstone of the Diablo experience, blending nostalgic routes with modern upgrades introduced in the 2025 patch. Whether you’re a newcomer or a seasoned veteran tackling ladder seasons, understanding efficient leveling routes saves hours of grinding and accelerates your journey to endgame content.
The progression is traditionally segmented into three phases: early game zones like Tristram, the core grind through Baal runs, and the modern, often meta-driven endgame featuring Terror Zones. Since the introduction of Terror Zones in the latest updates, the community’s approach to farming XP has evolved significantly, supplementing classic methods rather than replacing them. This guide consolidates years of community wisdom and patch-specific changes, providing the most up-to-date and efficient leveling strategies for 2025.
Quick Leveling Path Summary:
- Levels 1–15: Tristram Runs
- Levels 15–24: Tomb Runs
- Levels 25–60: Normal/Nightmare Baal Runs
- Levels 60+: Hell Baal, Chaos Sanctuary, and Terror Zones
This roadmap sets the stage for your leveling journey and integrates patch-specific shifts, like Terror Zone spawn timers and XP modifiers, so you can adapt effortlessly to the current meta.
Understanding Leveling Guide Diablo 2: Core Mechanics and Experience System
Experience (XP) in Diablo II: Resurrected is earned primarily through monster kills, with critical modifiers based on difficulty, player count, and quest completion. The game features a scaling XP system governed by the /players X command, which emulates multiple players in solo mode by increasing monster density and XP rewards. For example, /players 8 yields up to 300% XP per kill, simulating a full party without the need for other players. Actual multiplayer games share XP among participants, with the total XP split but enhanced overall by party synergy.
Common terms to know:
- /players X: Command setting player count for scaling XP and monster density.
- Power-leveling: Boosting a low-level character by high-level party members.
- Terror Zones: High XP spawn areas introduced in recent patches with rapidly cycling dense monster spawns.
- Baal Runs: Repeated boss runs in Act 5, offering high XP and item rewards.
- Normal/Nightmare/Hell: Game difficulties affecting monster level, resistances, and XP gains.
The XP gain by player count drastically shapes which runs and zones are most efficient, making mastery of these mechanics essential. The table below summarizes approximate XP gain modifiers by player count:
Players Count → XP Bonus Approximation
- 1 player: 100%
- 2 players: 150%
- 4 players: 200%
- 8 players: 300%
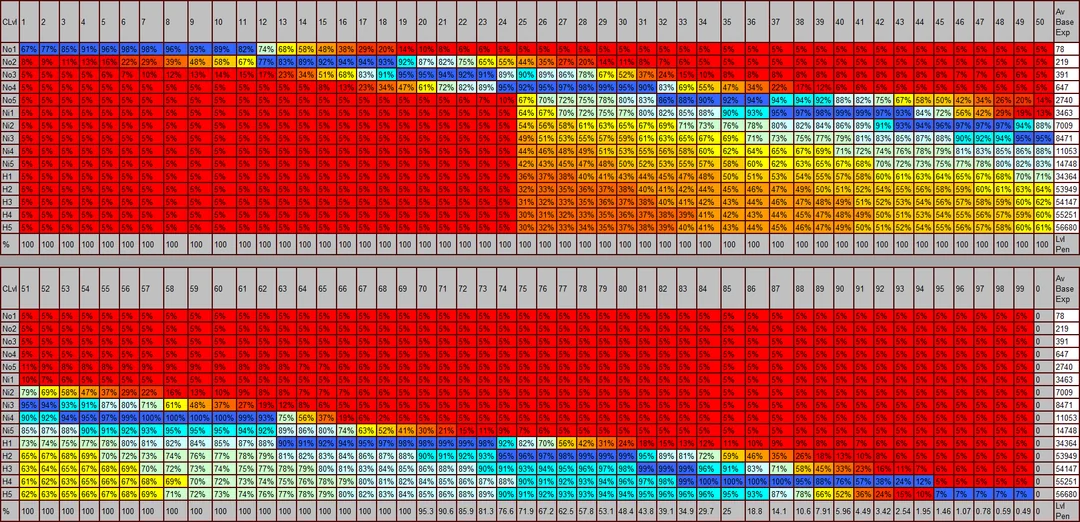
Understanding these mechanics underpins effective farming routes from early game to late endgame zones.
Early Game Progression: Tristram & Tomb Runs (Levels 1–24)
Starting strong is key. For levels 1 to 15, your best XP farming zone is Tristram, accessed after completing the Den of Evil quest. Tristram runs involve clearing the cathedral and crypts to maximize monster density and shrine utilization. Group play accelerates these runs by drastically increasing XP per kill, but solo players can maintain steady XP by focusing on clear speed and efficient waypoint use.
Once you reach level 15, transition to Tal Rasha’s Tomb runs in Act 2. The high monster density and grouped enemies here provide one of the best XP per minute ratios in the early game. Complete the required Arcane Sanctuary and Tomb of Tal Rasha quests to unlock these runs fully. Ensure you have sufficient resistances and survivability gear to handle elemental damage and fast monster attacks common in these zones.
What to avoid:
- Under-leveling before moving on, which causes XP penalties.
- Skipping important quests like Den of Evil or Ancients that grant essential skill points and bonuses.
- Poor party composition leading to slowed run speeds or missed XP.
Sample Early Game Progression Table
| Level Range | Zone | Method | Tips |
|---|---|---|---|
| 1–15 | Tristram | Full clears + shrine boosts | Group runs preferred; prioritize Den of Evil quest |
| 15–24 | Tal Rasha’s Tombs | Repeat tomb clears | Complete required quests; use poison resistance gear |
Early game sets the rhythm. Master Tristram and Tomb runs before moving into the core grind phase.
Core Leveling Grind: Baal Runs and Difficulty Progression (Levels 24–60)
By level 20, unlocking The Ancients quest is critical. This quest grants a major skill point and access to Baal runs, the centerpiece of your leveling grind from roughly level 24 to 60. To reach the Ancients swiftly, complete key quests in Act 1 and 2, and optimize your path by rushing through lower-density areas.
Baal runs involve clearing waves of minions and finally Baal himself in the Throne of Destruction. These runs, when done in a well-coordinated group, offer unparalleled XP and item drops. Group size affects both speed and XP, and while public games provide faster queues, private games offer control and security.
Switching from Normal to Nightmare ideally occurs around level 40–45, after gearing up with resistances and completing quests that unlock mercenary upgrades. Using the /players 8 command or playing in an 8-player public group at this stage maximizes XP gains.
Gear checks & quests to clear before advancing:
- Resistance-boosting charms and simple runewords like Stealth for survivability.
- Ancients quest completion for skill rewards.
- Maggot Lair and Arcane Sanctuary clear to boost XP and gather gear.
Run Efficiency Example:
Solo Baal run: ~10 minutes per run @ 100% XP
4-player party: ~6 minutes per run @ 200% XP shared
8-player party: ~5 minutes per run @ 300% XP shared
This phase transitions you from beginner zones to higher difficulties and prepares you for endgame farming.
Modern Endgame XP: Terror Zones vs. Traditional Hell Farming (Levels 60–99)
At level 60 and above, farming splits between traditional Hell difficulty zones and the newly introduced Terror Zones. Classic runs like Hell Baal, Chaos Sanctuary, and The Pit remain staples for high XP and ore farming. However, Terror Zones, added in recent patches, offer fast, dense monster spawns with shorter respawn timers, making them ideal for solo players wanting a high-risk, high-reward XP source.
Terror Zones cycle continuously, spawning groups of high-level monsters quickly. Solo players benefit from shorter runs, but parties can maximize XP per hour by dividing zones. Monitoring spawn timers and cycling through multiple Terror Zones is key to efficiency.
Comparison Table: Farming Method vs. XP/hr vs. Recommended Level vs. Party/Solo Viability
| Farming Method | XP per Hour | Recommended Level | Solo/Party |
|---|---|---|---|
| Hell Baal Runs | High | 60+ | Party favored |
| Chaos Sanctuary | Moderate | 70+ | Solo and Party |
| The Pit | Moderate-High | 75+ | Solo favored |
| Terror Zones | High | 60+ | Balanced; depends on spawn rotation |
Meta strategies often combine Hell Baal runs with Terror Zone cycling, adjusting methods as you progress toward level 99. Builds like Sorceress (Blizzard/Fire skills), Paladins (Hammerdin), and Barbarians (Frenzy) dominate these runs due to speed and survivability.
Class-Specific Leveling Strategies for Diablo II: Resurrected
Choosing the right build accelerates your leveling significantly. Below is a quick reference for top starter builds and transition points by class:
- Barbarian: Levels 1–24 Focus on Concentrate, switch to Frenzy by mid-game.
- Sorceress: Start with Frozen Orb, transition to Blizzard by level 30.
- Paladin: Early Zeal + Holy Shield; move into Hammerdin in Nightmare.
- Amazon: Begin with Magic Arrow, progress to Lightning Fury for AoE clear.
- Necromancer: Summoning builds early, transitioning to Poison Nova or Corpse Explosion.
Respec is typically advised around level 30 and again at 70+ to optimize endgame performance. Keep an eye on gear synergy when switching skills or builds.
Build Progression Chart Example
| Level Range | Key Skills Focus | Notes |
|---|---|---|
| 1–24 | Starter skills + survivability | Build fundamentals; gear easy access |
| 25–60 | Main build skills with slight respec | Unlock essential quests and gear |
| 60–99 | Endgame optimized skills and synergy | Final respec and gear upgrade |
Maximizing Group and Solo Efficiency: Which Route is Best?
Solo and group leveling each have advantages and trade-offs. Group leveling offers faster XP rates due to the /players X multiplier and combined damage output, shortening runs significantly. However, it requires coordination, compatible builds, and stable connections. Solo leveling provides greater flexibility and risk control, but at a slower pace.
Comparison Table: Solo vs. Party XP Rates and Best Classes
| Scenario | XP/hr (Approx.) | Best Classes |
|---|---|---|
| Solo | 500k–1M | Sorceress, Paladin, Necromancer |
| Party (4+ players) | 1.5M–3M | Barbarian, Paladin, Amazon (support roles) |
Power-leveling through carries is highly effective in ladder resets but lowers engagement and self-sufficiency. Parties with diverse builds covering damage types and crowd control tend to dominate the ladder races.
Essential Gear, Runewords, and Milestones for Each Level Bracket
Efficient leveling relies heavily on incremental gear upgrades and prioritized runewords. Early game items focus on survivability and damage output increasing movement and clear speed. Late game prioritizes resistance, faster cast rate, and life leech.
Tiered Gear Checklist:
- Act 1–2: Stealth (Tal + Eth), Leaf staff (for casters)
- Act 3–5 (Nightmare): Spirit sword/shield, insight mercenary runeword
- Hell Difficulty: Fortitude, Enigma, and other high-tier runewords
Seasonal farming methods focus on efficient rune gathering through Baal runs and key questing, accelerating access to runes needed for these masterpieces.
Gear Progression Sample Table
| Level Range | Runeword | Recommended Items |
|---|---|---|
| 1–24 | Stealth, Leaf | Light armor, ethereal weapons |
| 25–60 | Spirit, Insight | Resist gear, mercenary upgrades |
| 60–99 | Fortitude, Enigma | High resist, faster cast rate gear |
Advanced Tips, Community Wisdom, and Common Leveling Pitfalls
Avoid common mistakes like skipping key quests that grant skill points or attempting Hell too early without proper resistances, which leads to frequent deaths and XP loss. Shrine stacking near boss runs increases clear speeds and XP by boosting your character’s stats temporarily.
Quick group formation reduces downtime—always TP up early and coordinate roles to maintain speed. Manage your inventory to keep key charms and potions accessible to prevent run interruptions.
Mini-FAQ:
- When should I switch to Hell difficulty? After reaching level 60 and securing adequate resists and gear.
- Is Terror Zone farming safe on Hardcore? It’s riskier due to dense spawns; prioritize survivability and quick escapes.
- Can I level efficiently solo? Yes, but expect slower XP gains compared to group play.
- What’s the fastest leveling method? High-coordination Baal runs with a full party on /players 8 settings.
Community-driven strategies continually refine these approaches; engage with forums for the latest insights.
Frequently Compared and Contextual Questions
Is it possible to level efficiently solo in Diablo II: Resurrected?
Yes. While slower than party play, efficient solo runs like Tristram early and Terror Zones late offer solid XP.
What exactly is a Baal run, and why is it essential?
Baal runs are repeated boss fights within Act 5 where you kill waves of minions then Baal himself, yielding massive XP and loot, crucial for mid- and late-game leveling.
What are the main endgame farming routes in D2R?
Hell Baal runs, Chaos Sanctuary, The Pit, and newly introduced Terror Zones comprise the core endgame farming spots.
How does leveling in D2R 2025 compare to classic D2?
The core mechanics remain, but Terror Zones and updated spawn/reset timers enhance late-game leveling efficiency.
Which leveling method is fastest for each class?
Generally, AoE casters like Sorceress favor Baal runs and Terror Zones, while melee classes benefit most from group Baal runs and Chaos runs.
What leveling methods are highest risk in Hardcore mode?
Terror Zones and Hell difficulty Baal runs due to dense mobs and high damage.
For casual players, what’s the most forgiving route?
Slow but steady solo Tristram and Tomb runs remain forgiving and safe for casual play.
Conclusion
Efficient leveling in Diablo II: Resurrected is all about knowing the right zones, builds, and strategies for each stage of your journey. From early Tristram and Tomb runs, to mid-game Baal grinds, and finally the high-risk, high-reward Hell zones and Terror Zones, mastering these paths saves time and maximizes XP gains.
Pairing optimized builds, gear upgrades, and group coordination with this leveling roadmap ensures you progress smoothly and safely, whether solo or in multiplayer. By following the 2025 patch meta, you can reach level 99 faster and prepare your character for the ultimate endgame challenges.
For up-to-date strategies, tips, and community-tested insights, explore Softbuzz, your hub for expert Diablo II guides.









![[LOL] How to Download League of Legends on PC Latest Version 19 [LOL] How to Download League of Legends on PC Latest Version 18](https://softbuzz.net/wp-content/uploads/2020/07/cach-tai-lien-minh-huyen-thoai-lol-ve-may-tinh_softbuzz_12.jpg)
![[DTCL] Top 5 Strongest Team Compositions in Teamfight Tactics 10.14 23 [DTCL] Top 5 Strongest Team Compositions in Teamfight Tactics 10.14 22](https://softbuzz.net/wp-content/uploads/2020/07/doi-hinh-dau-truong-chan-ly-manh-nhat-mua-3.jpg)