Are you looking for the latest method to disable windows defender win 10 permanently? Don’t miss the article below from Softbuzz, where I will share with you the best and most effective ways to turn off defender win 10 permanently in 2023.
Let’s start right now!
What is Windows Defender? Should You turn off Windows Defender in Win 10
Before diving into how to turn off Windows Defender in Win 10, have you ever wondered what Windows Defender is? Should you disable Windows Defender win 10?
Windows Defender is one of the built-in, free antivirus software available in the Windows operating system. It helps protect your computer from virus attacks without the need to install additional antivirus software. However, it only provides basic protection.
Are you ‘fed up’ with your computer constantly updating Windows? Everything can be found here:
For those frequently installing software, especially activation programs, you might encounter error operation did not complete successfully because the file contains a virus or potentially unwanted software. And your activation files will be deleted. Do you know why? How to fix the error operation did not complete successfully?
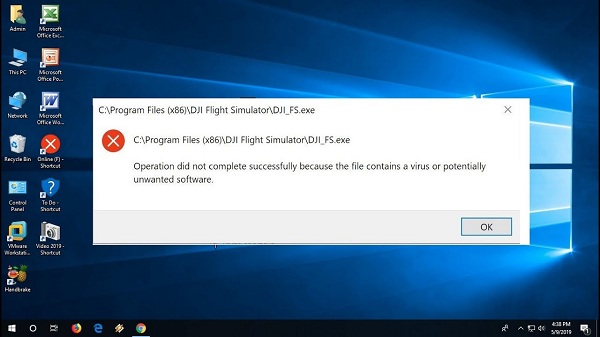
The reason here is that Windows Defender in Win 10 mistakenly detects this file as a virus and deletes it. At this point, disabling Windows Defender Security Center in Win 10 or completely disabling Windows Defender in Win 10 is necessary. To get a genuine Softbuzz Ghost Win 10, visit this link:
So how to turn off Windows Defender in Win 10? Stay tuned for the next part of the article for more details.
How to permanently turn off Windows Defender Win 10
Disabling Windows Defender via Settings
If you still want to use Windows Defender in Win 10 to protect your computer but only want to temporarily disable it, follow these steps:
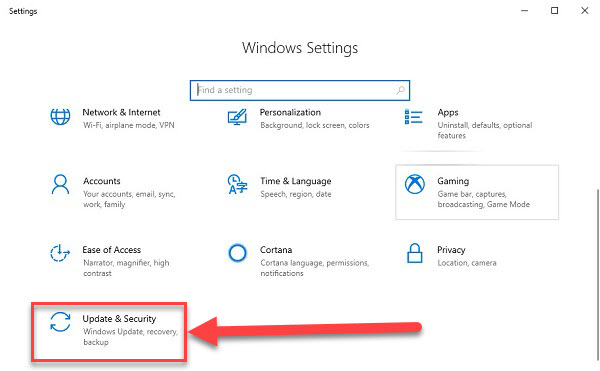
Step 1: Open Windows Settings by pressing Windows + I
Step 2: Choose Update & Security
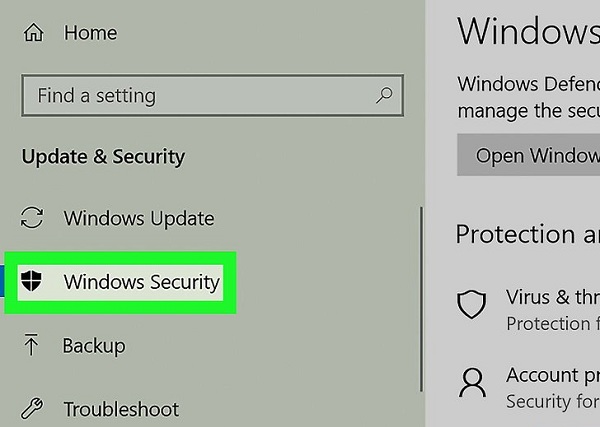
Step 3: Select Windows Security
Step 4: Choose Virus & threat protection
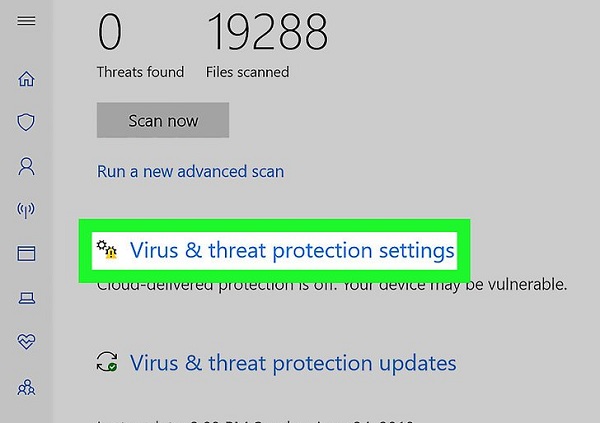
Step 5: In the new dialog box, under Virus & threat protection settings, select Manage settings.
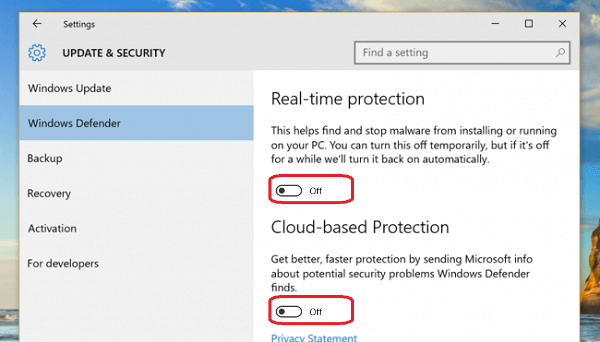
Step 6: Turn off Real-time protection and Cloud-delivered protection

Step 7: Also in this dialog, find the Notifications section and click Change notification settings.

Step 8: Select manage notifications in the notifications section.
Step 9: Turn off Virus & threat protection notifications.
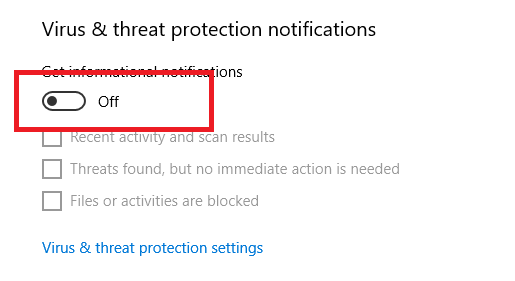
Disable Windows Defender via Local Group Policy
Turning off Windows Defender in Win 10 will help optimize your Win 10 effectively. For more optimization tips, don’t miss:
To permanently disable Windows Defender in Win 10, follow these steps:
Step 1: Open the RUN dialog by pressing Windows + R
Step 2: Type gpedit.msc

Step 3: Find the Windows Defender section via the path:
Local Computer Policy => Computer Configuration => Administrative Templates => Windows Components => Windows Defender
Step 4: Find and double-click the Turn off Windows Defender item
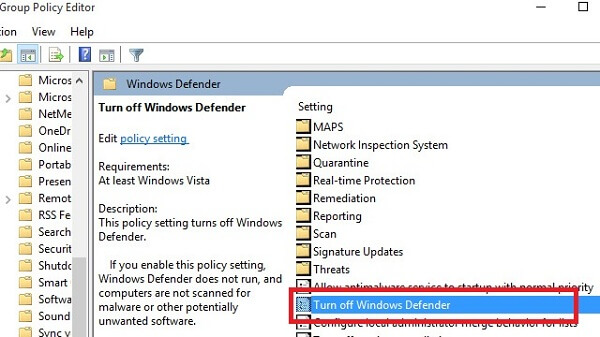
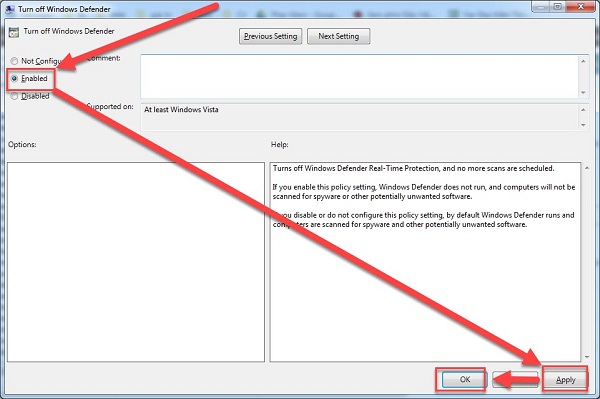
Step 5: In the Turn off Windows Defender dialog, select Enabled => Click Apply => Click Ok
Disable Windows Defender via Registry
Alternatively, you can disable Windows Defender in Win 10 via registry if other methods are ineffective.
Step 1: Open the run dialog with Windows + R
Step 2: Type regedit and press Enter

Step 3: Navigate to the registry path:
HKEY_LOCAL_MACHINE => SOFTWARE => Policies => Microsoft => Windows Defender
Step 4: Find the DWORD DisableAntiSpyware. If not present, create by right-clicking on the empty space, selecting New => DWORD (32-bit) Value, and naming it DisableAntiSpyware
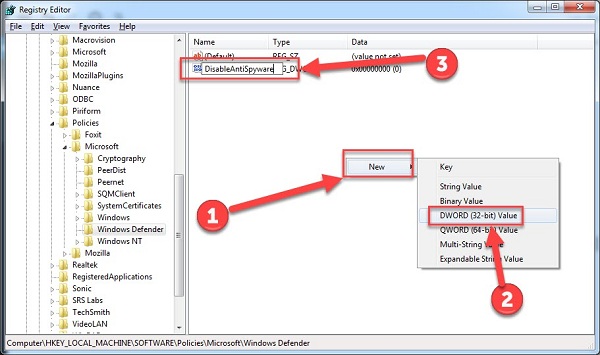
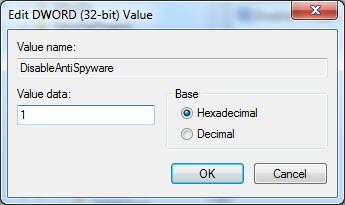
Step 5: Double click this key, set the value from 0 to 1 in the value data
Conclusion
That’s it! Softbuzz has shared with you all three methods to permanently disable Windows Defender in Win 10 with 100% success rate. You can choose one of the three ways above. After turning off defender, try to extract the activation file again to check the results.
Wish you success! Thank you for following the article!
Compiled by Softbuzz


