How to split the Win 10 screen will help you use more conveniently when working back and forth between 2 application windows. It will assist you greatly in comparing 2 documents. You will no longer waste time switching back and forth.
So, do you know how to split the Win 10 computer screen yet? Let’s explore the details with Softbuzz in the article below. Let’s start right now.
How to enable split-screen mode on Win 10
To perform the split-screen on Win 10 on your computer, you need to enable split-screen mode. It’s not too difficult; just follow the instructions below.
You may be interested.
How to turn off background applications on Win 10
Step 1: Press the Windows + I key combo to open the Settings dialog.
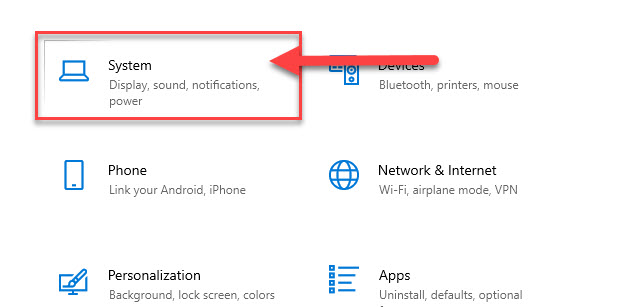
Step 2: Select System.
Step 3: Select Multitasking -> Turn On for Snap Windows.
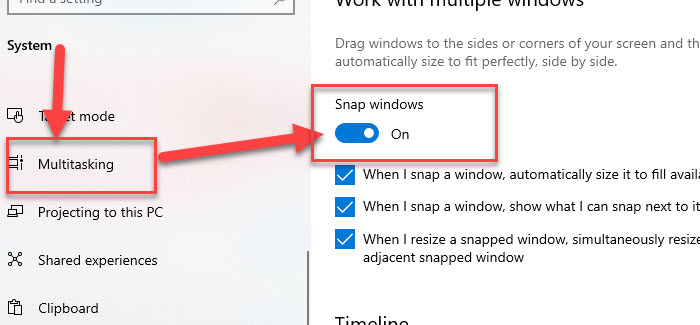
After activating the Snap Windows mode, you can proceed with the different methods to split the Windows 10 screen.
3 detailed ways to split the Win 10 screen
Below are some simple and effective ways to split the Win 10 screen. The methods include:
Splitting the Win 10 computer screen using the mouse
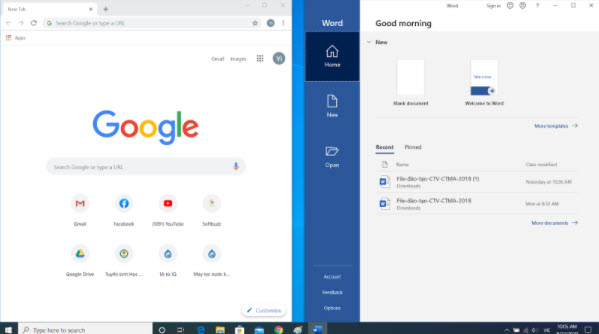
Using the mouse is the simplest way to split the Win 10 screen. Just drag the application window you’ve minimized to the left or right side of the screen, then do the same with another app on your computer.
You need to use the mouse to resize the dialogs to your liking. This way of splitting the laptop screen with a mouse can be time-consuming and may not be aesthetic, so you might opt for another method. :)))
Splitting the laptop screen Win 10 via Taskbar
This method of splitting Win 10 screen by using the Taskbar is quite interesting. It automatically divides the screen based on the number of applications open on the screen.
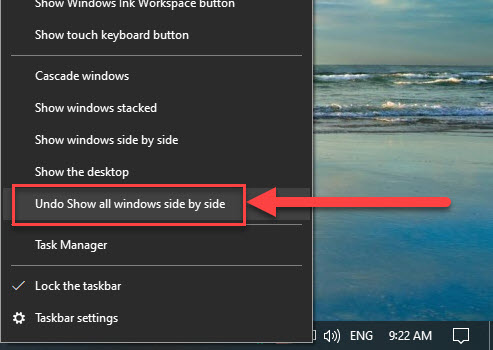
To activate this feature, right-click on the Taskbar -> select Show windows side by side. The computer will help you split the laptop screen according to the number of applications you’ve opened.
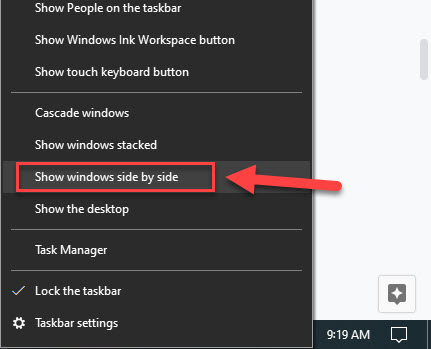
To bring the screen back to the original, just click again on the Taskbar and select the part Undo Show all windows side by side.
Splitting the Win 10 screen with shortcut keys
Using shortcut keys is a method I often use to split the Win 10 screen. It not only helps you split the screen evenly and aesthetically but also allows you to divide the screen into 4 parts. This makes working and comparing documents more convenient without switching tabs back and forth.
To do this, just press the Windows + arrow keys to the left / Windows + arrow keys to the right to split the computer screen. You can also apply this method to split the Win 7 screen. It’s quite simple and convenient.
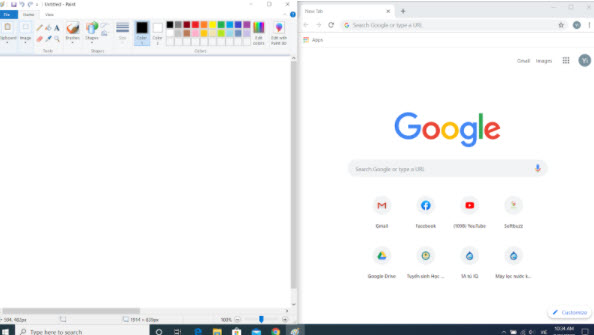
If you want to split the Win 10 screen into more than 2 parts, combine the Windows key with the up, down, left, right arrow keys. It will bring an interesting experience. Give it a try.
Final words
That’s all from Softbuzz about the sharing of how split Win 10 screen that we’ve compiled. Hopefully, these tips will help you manage your busy work more effectively.
If you want to learn more about other tricks on mobile or PC, visit the website https://softbuzz.net/ where we share tips about PC, focusing on technology knowledge, providing a variety of software applications, graphic office tools for Windows, ghost, and other entertainment software. Wishing you successful implementations.
Wish you success! Thanks for following the article.


